“Sign in with Apple” (aka Apple Sign-In) is a “single sign on” (SSO) service from Apple enabling users to sign into apps using their Apple ID. It provides an alternative to other external identity providers (IdPs) such as Facebook, Google or Twitter. Apple Sign-In is based on the open standards OAuth 2.0 and OpenID Connect (OIDC). The Virtuoso Authentication Layer (VAL) supports a wide variety of OAuth and OIDC IdPs. Any of the supported IdPs can be used as an external authentication service when logging into a Virtuoso application, such as a Virtuoso SPARQL endpoint /sparql. This note describes how to register Apple Sign-In with VAL as an IdP.
Conceptually, the process for integrating Apple Sign-In as one of the IdP options exposed via VAL is as follows:
- Register your VAL-enabled Virtuoso instance as an Application (the Relying Party) with Apple’s Identity Provider Services
- Add Apple’s Identity Provider to the the collection of IdPs registered with your VAL-enabled Virtuoso instance.
Before detailing the steps in this process, we provide some context…
Background
Although OIDC supports dynamic registration, if using manual registration, OAuth providers typically require an application to be registered through one or more web forms to obtain a client ID and secret. Apple’s approach is different and relies on public key authentication. Rather than supply an application with a secret directly, Apple provides the application with a public/private key pair. The client secret must then be generated from the private key programmatically. It is typically up to the user registering the OAuth application to provide a program to perform this private key to client secret conversion. However VAL integrates generation of the client secret into the VAL UI for registering VAL with third party IdPs.
Prerequisites
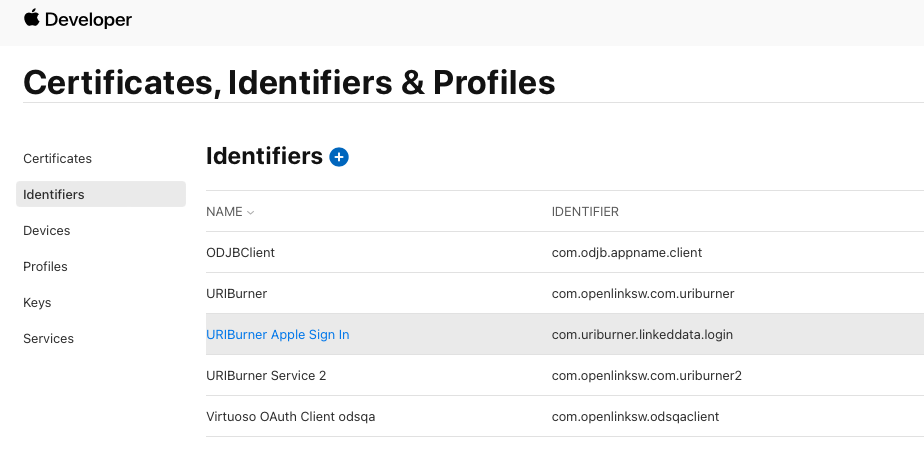
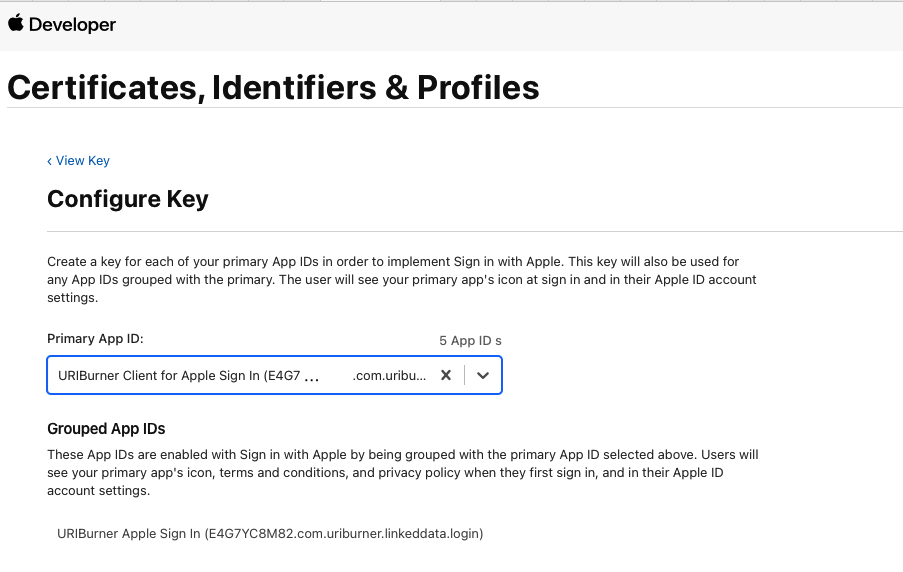
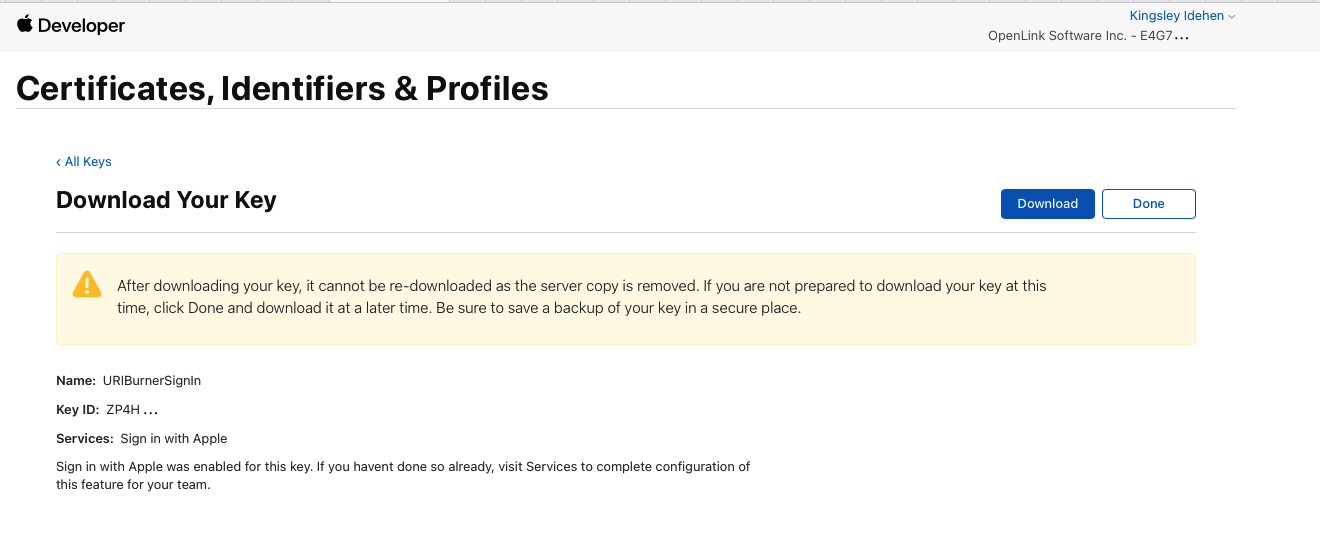
You first need to have registered an application with Apple Sign-In using Apple Developer portal and downloaded the associated private key (supplied as a downloadable PKCS#8 .p8 file). IDs you need to record from the Apple Sign-In registration are:
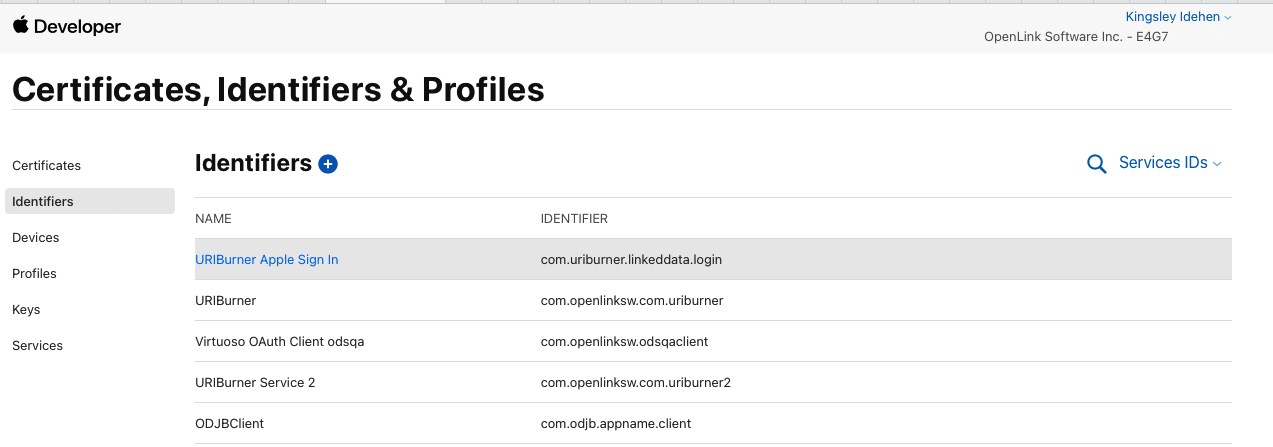
- Services ID
- Visible as an identifier listed under the Apple Developer portal’s menus ‘Certificates, Identifiers & Profiles’ / ‘Identifiers’ / ‘Service IDs’
- Typically a reverse-domain name style string.
- Used as your OAuth
client_id.
Services ID

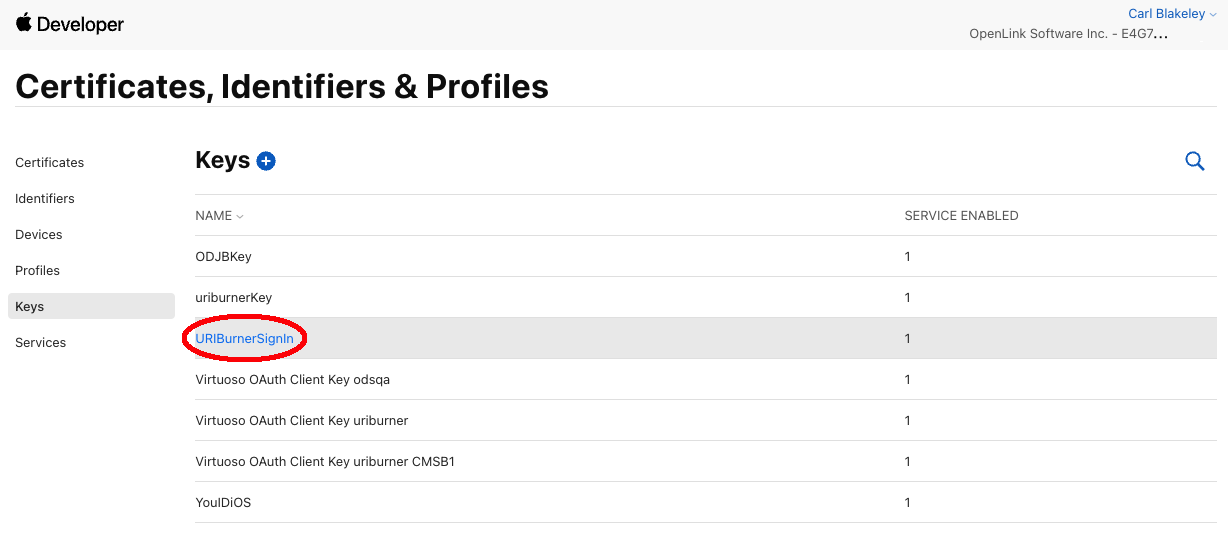
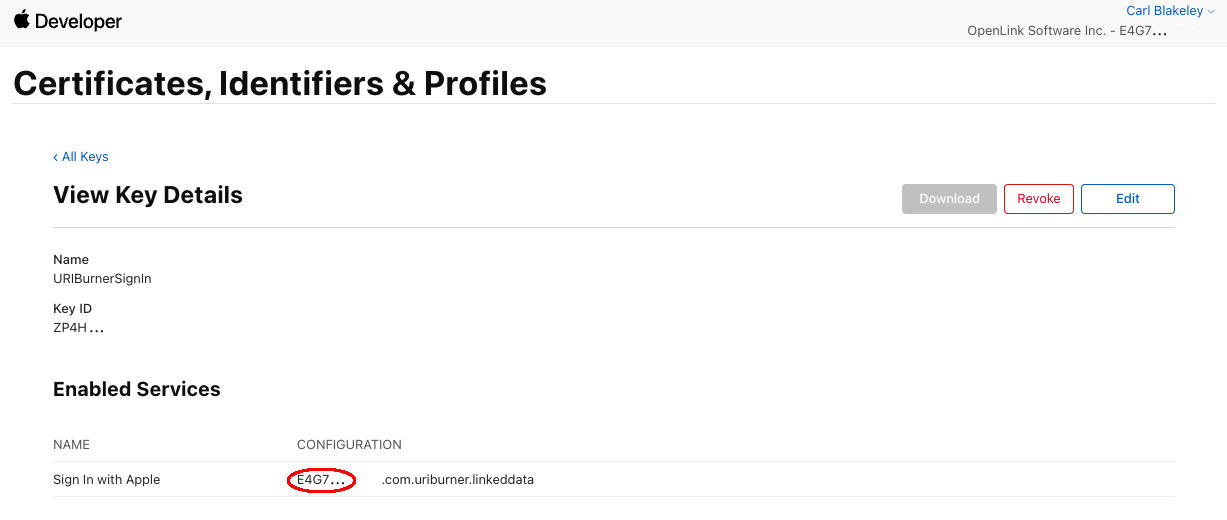
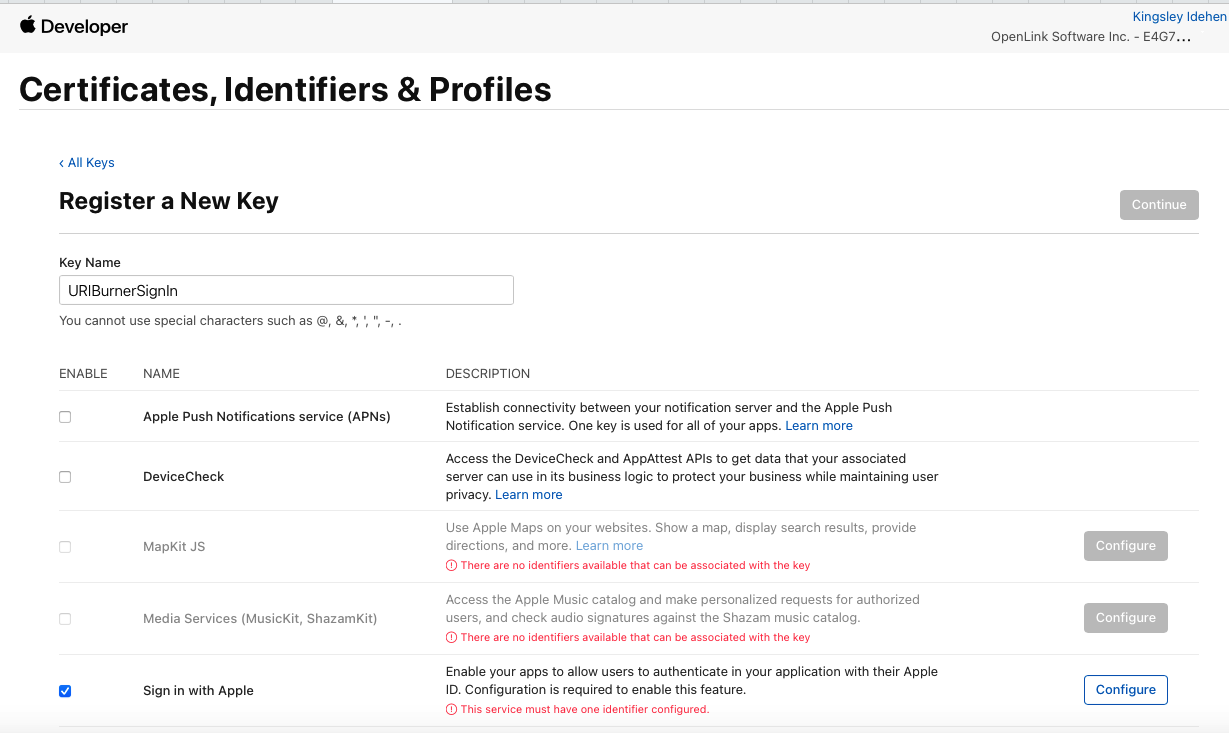
- Key ID
- Visible in portal screen ‘View Key Details’ which is accessed via menus ‘Certificates, Identifiers & Profiles’ / ‘Keys’ then selecting one of the listed keys.
Key ID
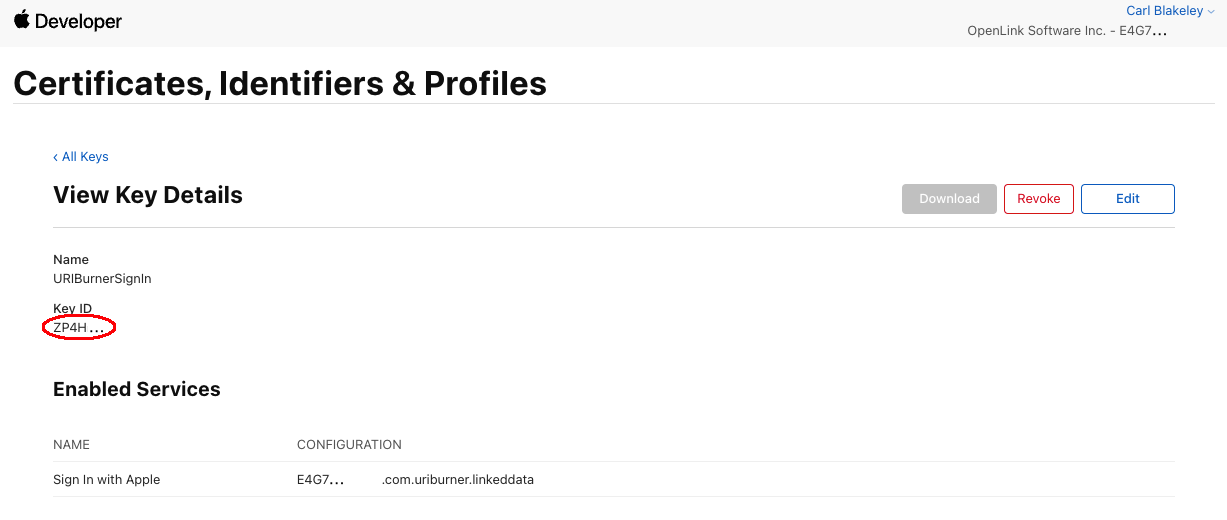
- Team ID
- Visible in the ‘View Key Details’ screen, the Team ID forms the first part of the named configuration associated with the enabled service ‘Sign In with Apple’. The named configuration is in the form
{team-id}.{reverse-dns-id} - Also called ‘App ID Prefix’ in the ‘App ID Configuration’ screen accessible via menus ‘Certificates, Identifiers & Profiles’ / ‘Identifiers’ / ‘App IDs’ then selecting one of the listed App IDs.
- Visible in the ‘View Key Details’ screen, the Team ID forms the first part of the named configuration associated with the enabled service ‘Sign In with Apple’. The named configuration is in the form
Team ID
See Also
- https://appleid.apple.com/#!&page=signin - for App ID and Service ID setup
- https://developer.okta.com/blog/2019/06/04/what-the-heck-is-sign-in-with-apple - a HowTo Guide
Registering an OAuth App with Apple & Obtaining a Private Key
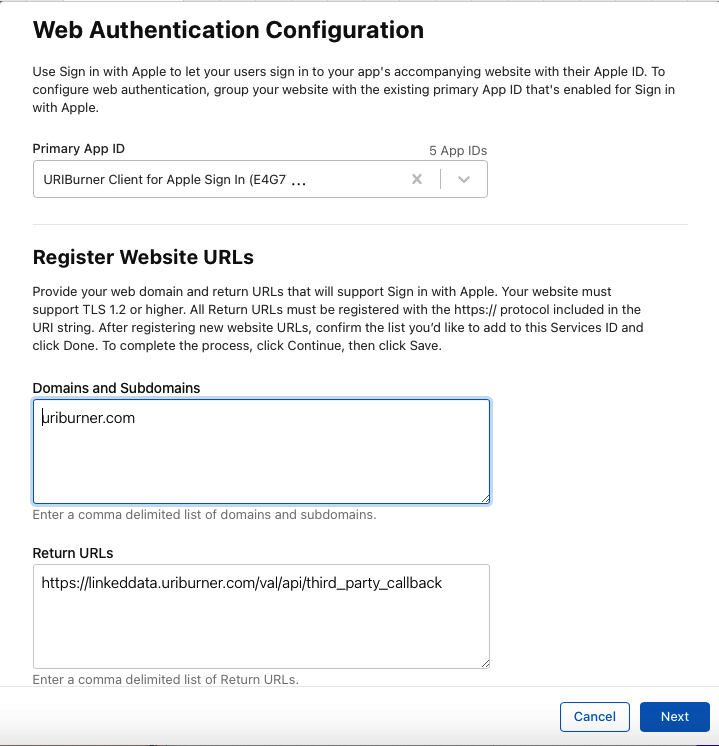
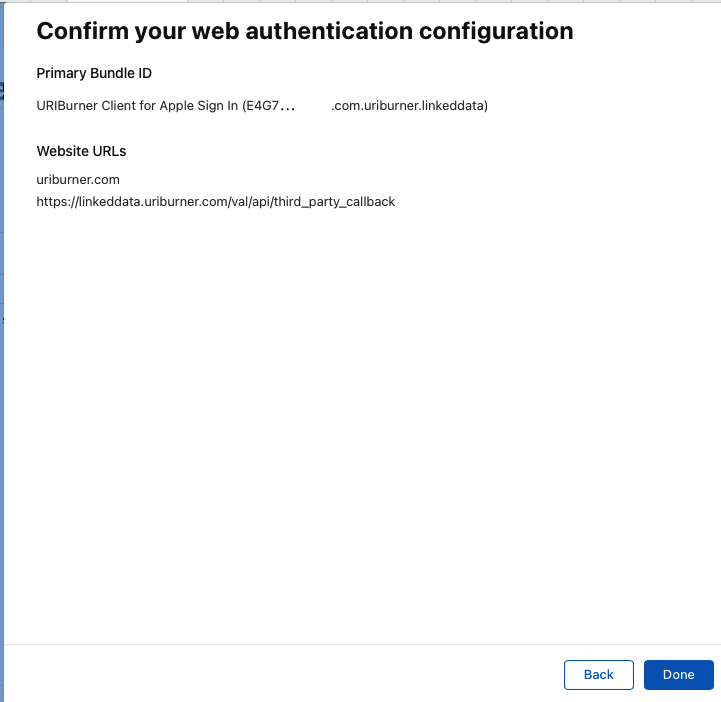
The screenshots below illustrate how to register an OAuth application (in this case a VAL OAuth client) with Apple Sign-In via the Apple Developer portal and how to download the required private key.
As part of this registration, you must also provide the callback URL of the VAL OAuth client. This is always of the form:
https://{VAL host}/val/api/third_party_callback
App Registration in VAL
Armed with an Apple-provided private key and the above Apple IDs, you’re now in a position to configure and associate a Virtuoso OAuth Client (Relying Party) with the Apple Sign-In service.
Go to the VAL’s OAuth Identity Provider Management screen https://{your-virtuoso-instance}/oauth/admin.vsp, logging in as dba (or as a user with dba privileges).
Select ‘Add New Identity Provider’.
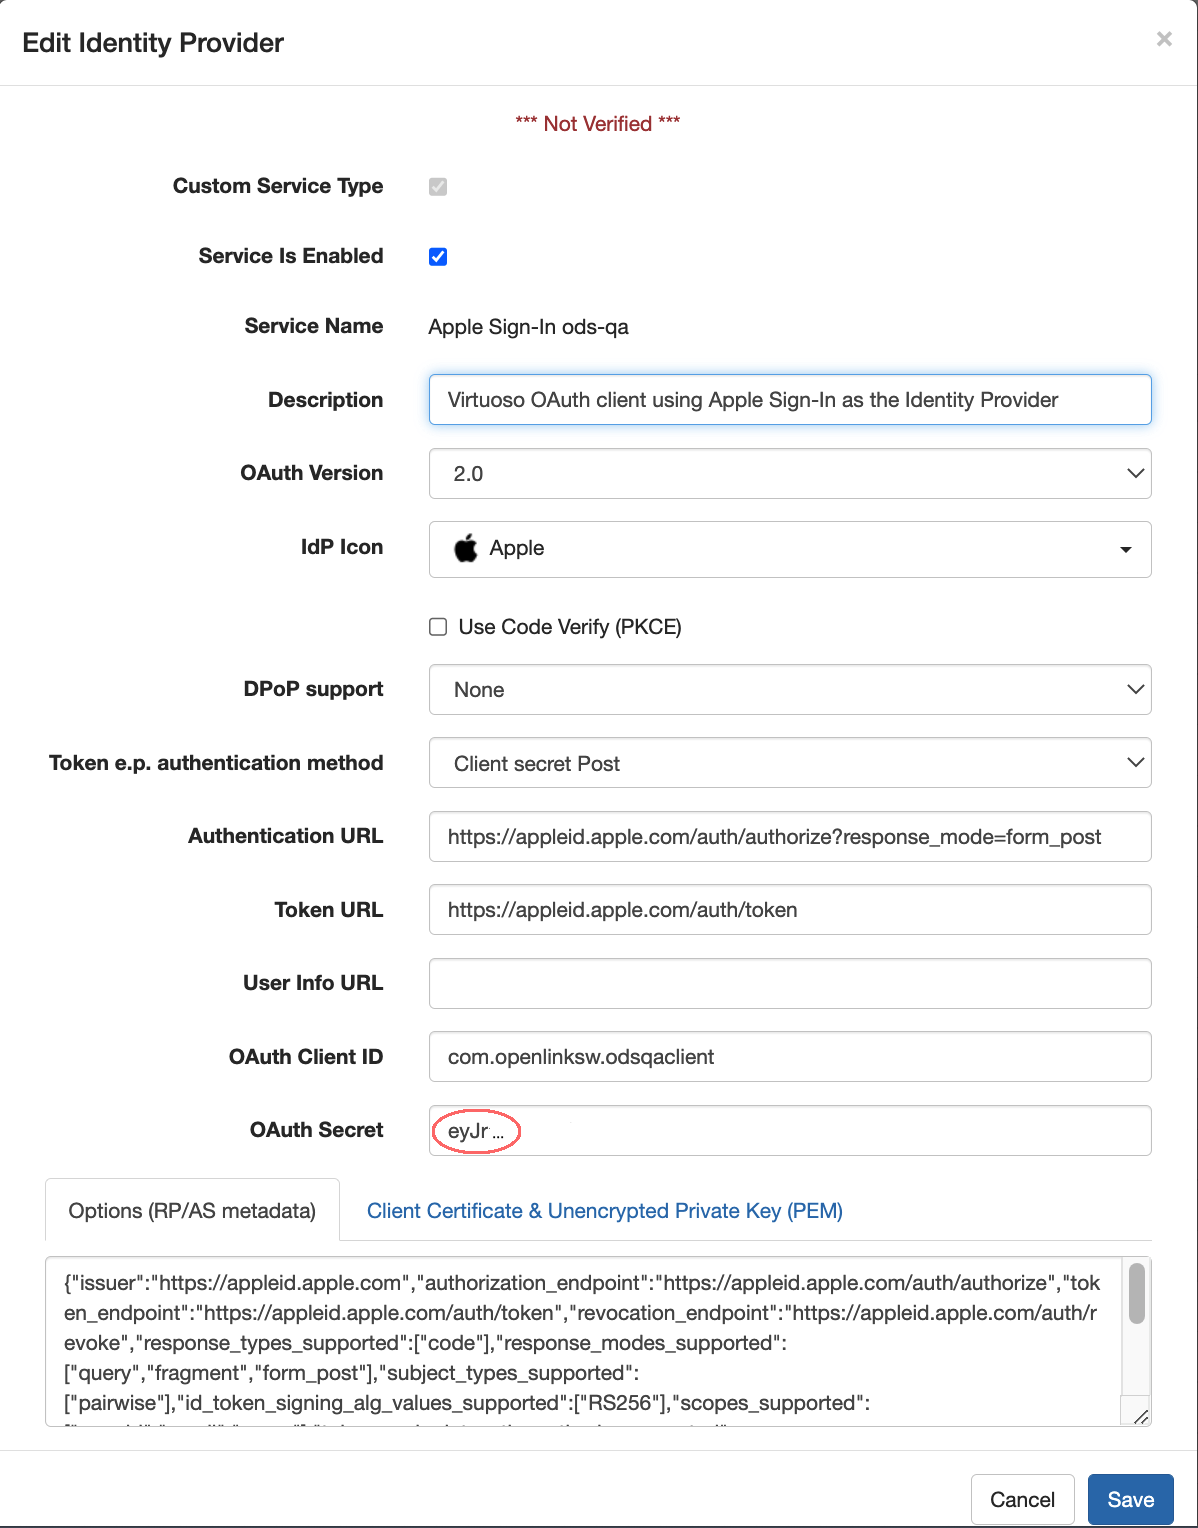
Complete the ‘New Identity Provider’ form as illustrated below. Ensure that ‘IdP Secret Generator’ is set to ‘Apple’, ‘Dynamic Client Registration’ is unchecked and ‘Generate OAuth Secret for Apple Sign-In’ is checked. Enter your Services ID as the OAuth Client ID. It’s also recommended that you enable ‘Dynamic Provider Information Discovery’.
Because the OAuth client secret will be generated by Virtuoso, leave ‘OAuth Secret’ empty.
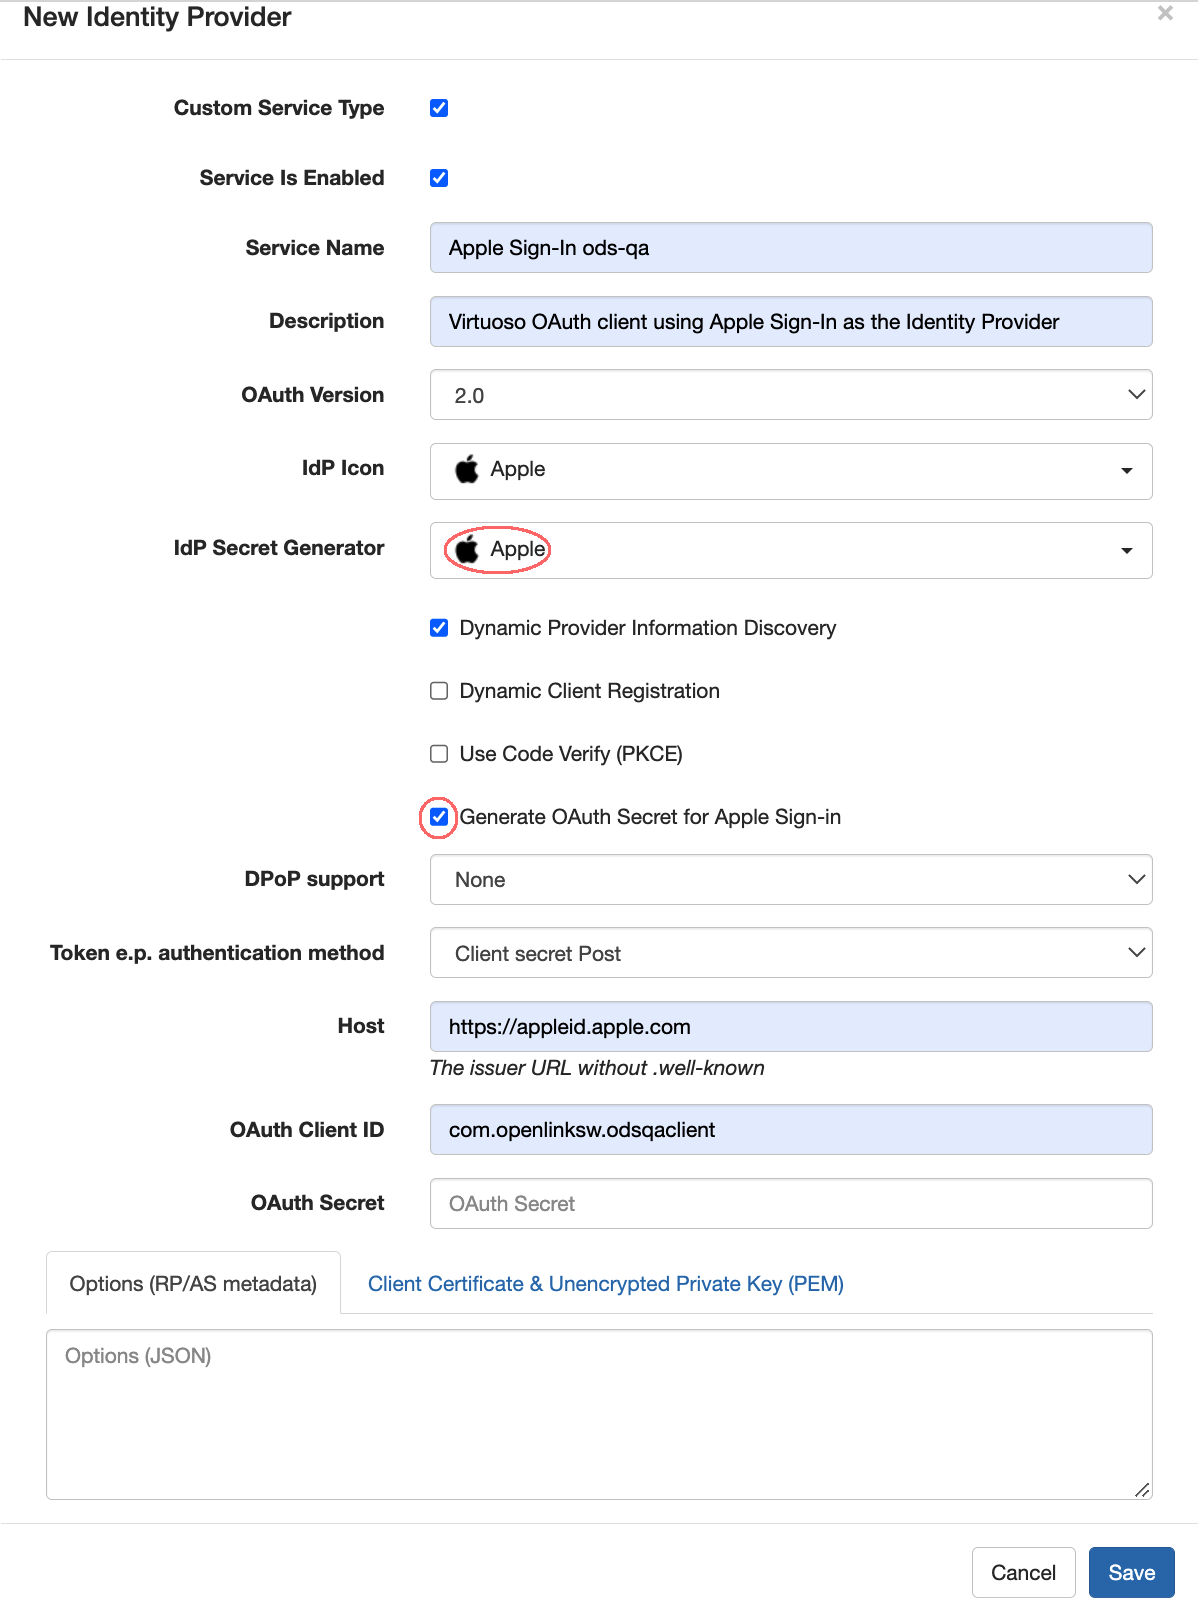
On clicking ‘Save’ you will be taken to the screen ‘OAuth Client Secret Generator for Apple Sign-In’. Enter your Apple Key ID and Team ID and paste in the contents of the .p8 file containing your private key. Your private key is held only temporarily to generate a client secret. It is not stored by Virtuoso.
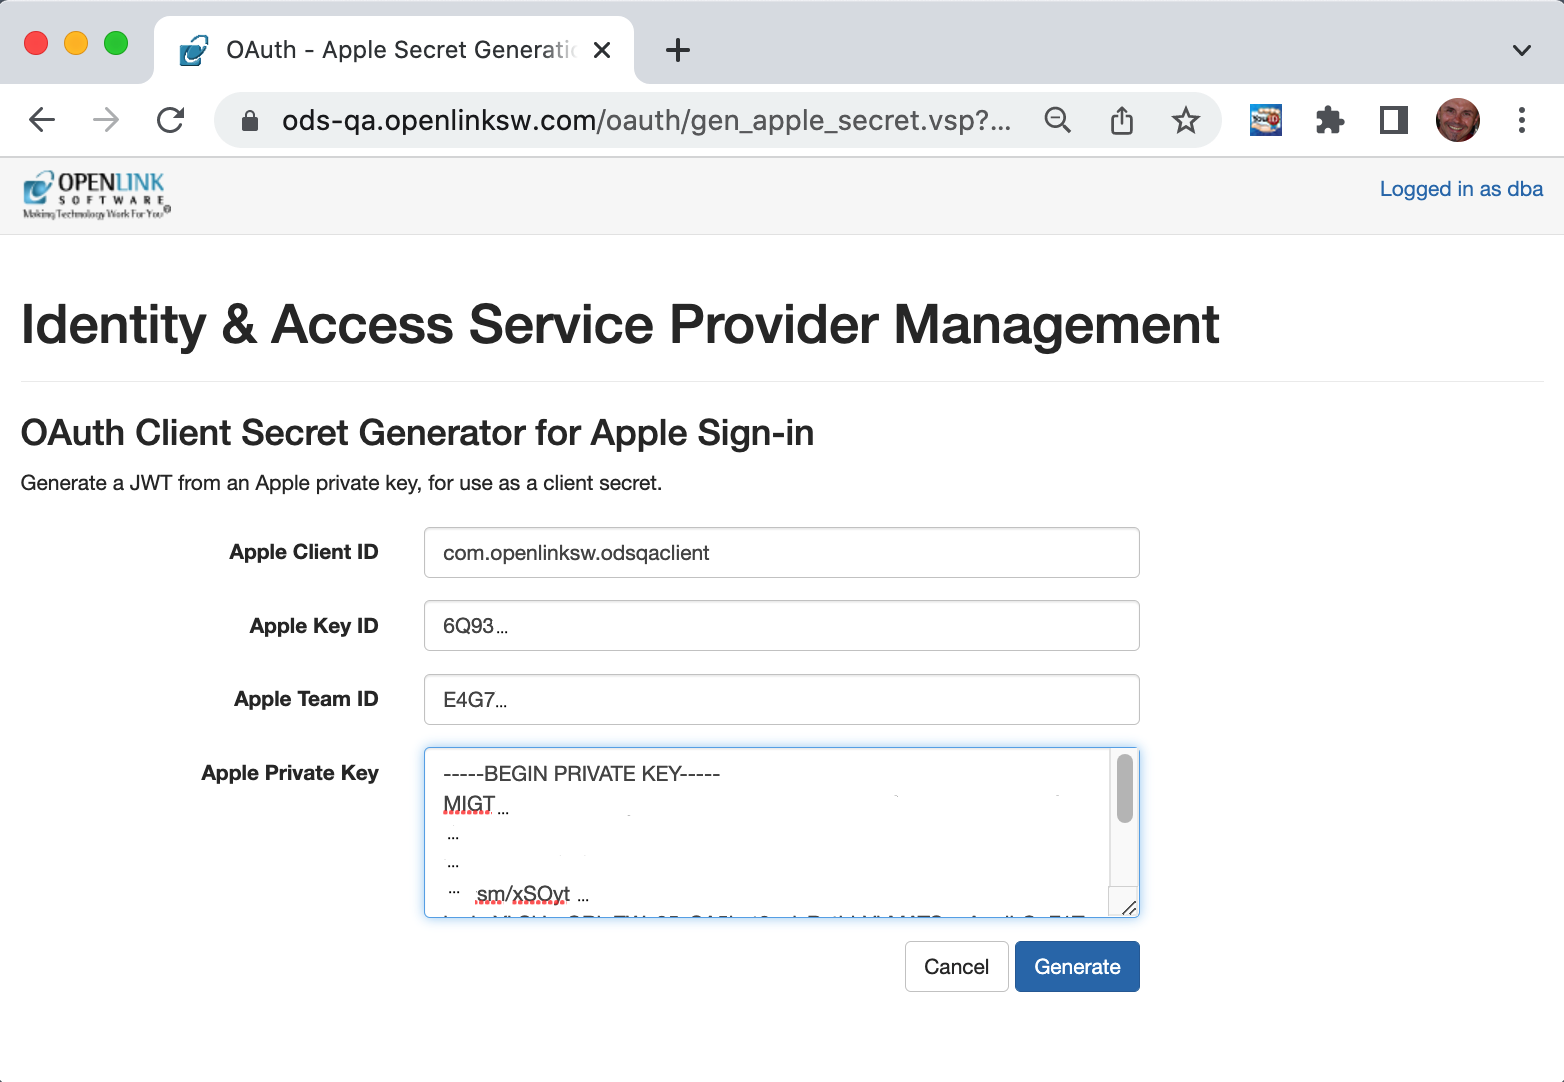
After clicking ‘Generate’ you should be returned to the ‘OAuth Identity Provider Management’ screen. Click on the newly created OAuth client registration. The previously empty ‘OAuth Secret’ field should now contain your generated OAuth client secret.
Note
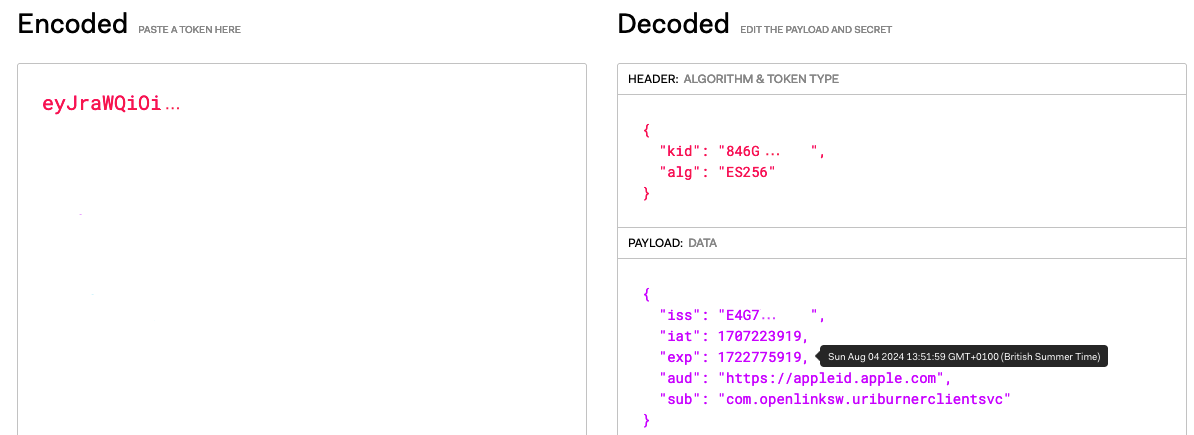
The client secret is an ES256-signed JWT signed using your Apple private key. You can decode and inspect the JWT using jwt.io or a similar service. The JWT is structured as below:
Header:
{
  "kid": "<Key ID>",
  "alg": "ES256"
}

Payload:
{
  "iss": "<Team ID>",
  "iat": <issued datetime>,
  "exp": <expiry datetime>,
  "aud": "https://appleid.apple.com",
  "sub": "<Client/Services ID>"
}
The JWT expires after 180 days. You will need to generate a new client secret once it expires.
If you enabled ‘Dynamic Provider Information Discovery’ earlier, VAL will have used server metadata from the OAuth server’s .well-known/openid-configuration endpoint to obtain the details of key OAuth endpoint URLs. Among these is the OAuth server’s authentication endpoint. The URL returned in the Apple Sign-In service metadata is not quite correct. Add the query string ?response_mode=form_post to the Authentication URL field. Save the VAL form.
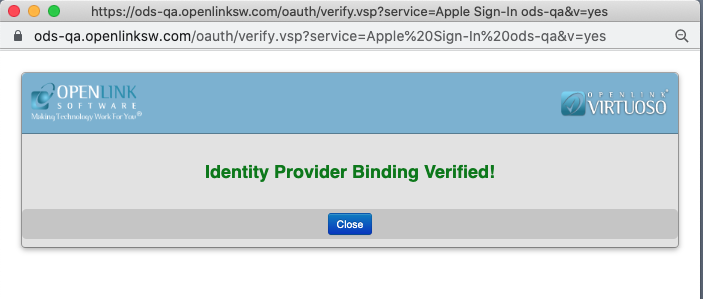
Next, you can confirm that the VAL to Apple Sign-In binding works by clicking the ‘Verify’ button adjacent to the IdP’s name in the IdP list.
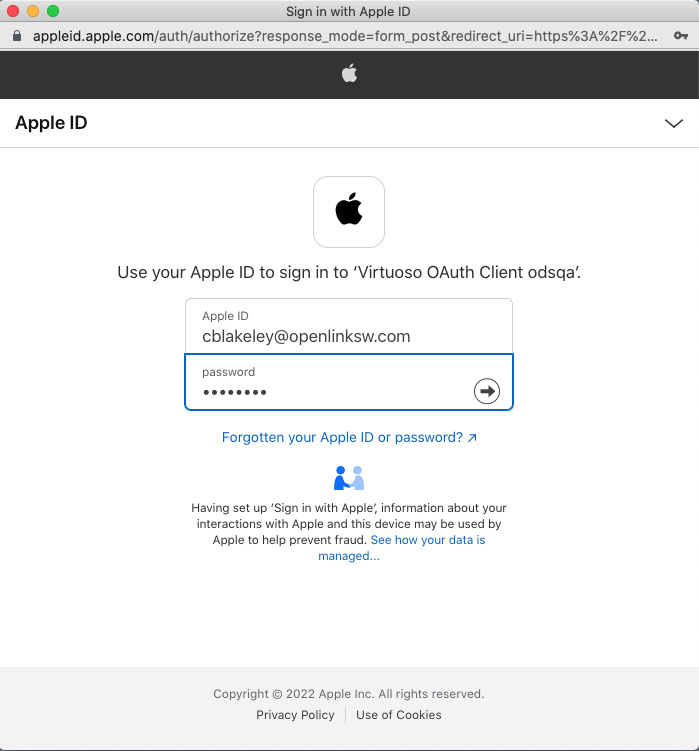
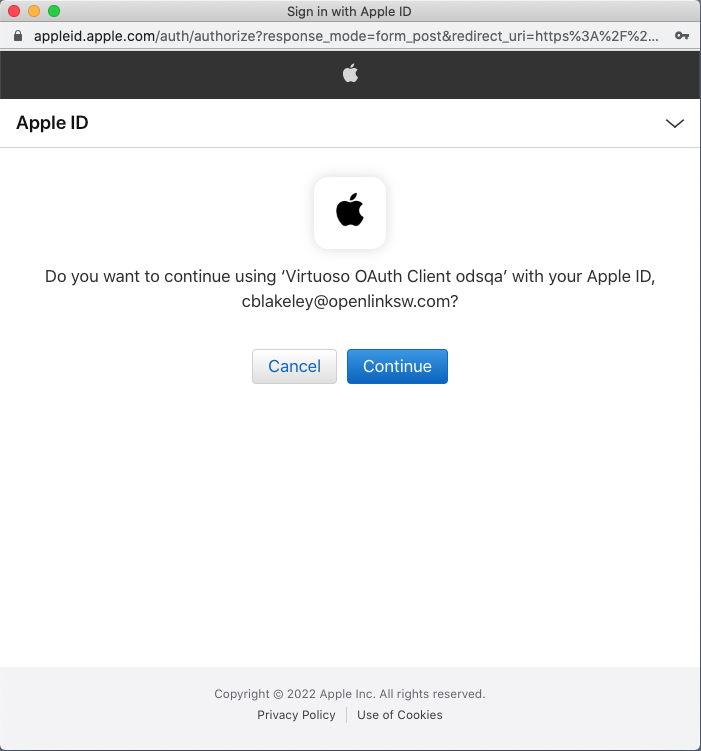
If you successfully sign in, you will see a ‘Identity Provider Binding Verified’ dialog box.
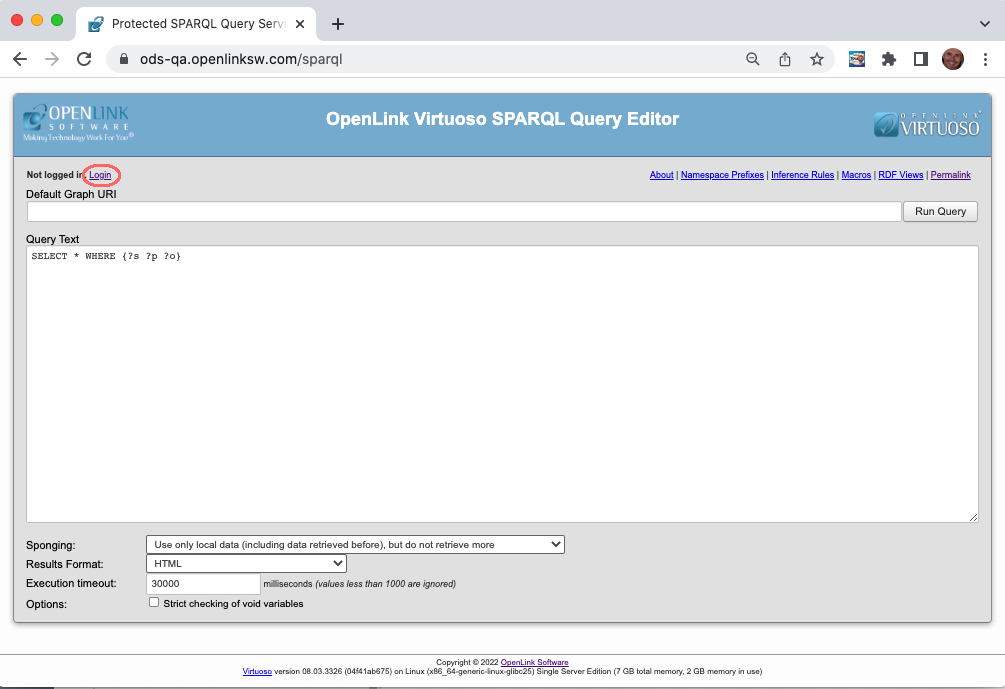
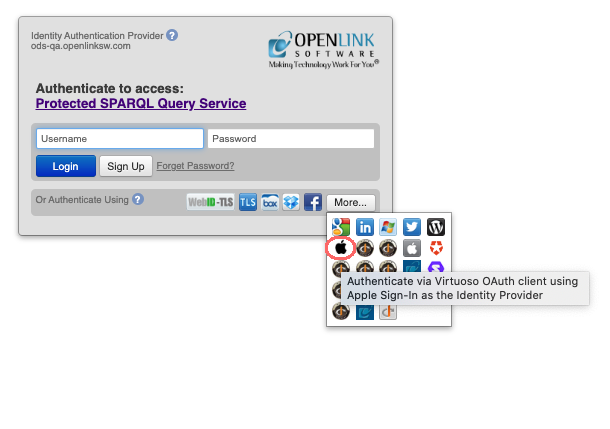
You can now use the Apple Sign-In service to log into Virtuoso applications. The following screenshots illustrate logging into Virtuoso’s ‘/sparql’ service. The login dialog includes an icon for Apple Sign-In among those for all the IdPs registered in VAL for authentication.
Note:
If you fail to generate an Apple client secret by a misstep in the above sequence, you cannot do it after the VAL OAuth binding has been created. You must then start from scratch by creating a new binding in admin.vsp.
Updating an Expired Client Secret
The JWT which forms the OAuth client secret expires after 180 days. You will need to generate a new client secret once it expires. You can do so using your existing .p8 file containing your current Apple-supplied private key.
The jwt.io service provides an easy way of checking if the secret has expired. Simply copy the expired client secret JWT into the UI and hover over the exp (expiry) claim.
You cannot generate a new client secret in admin.vsp by editing the VAL registration containing the expired one. Instead, create a new VAL binding for Apple Sign-In, following the procedure detailed above starting at “App Registration in VAL”. Because VAL does not allow duplicate client IDs, you first need to delete the VAL binding holding the expired client secret.