Situation Analysis
Some Stats
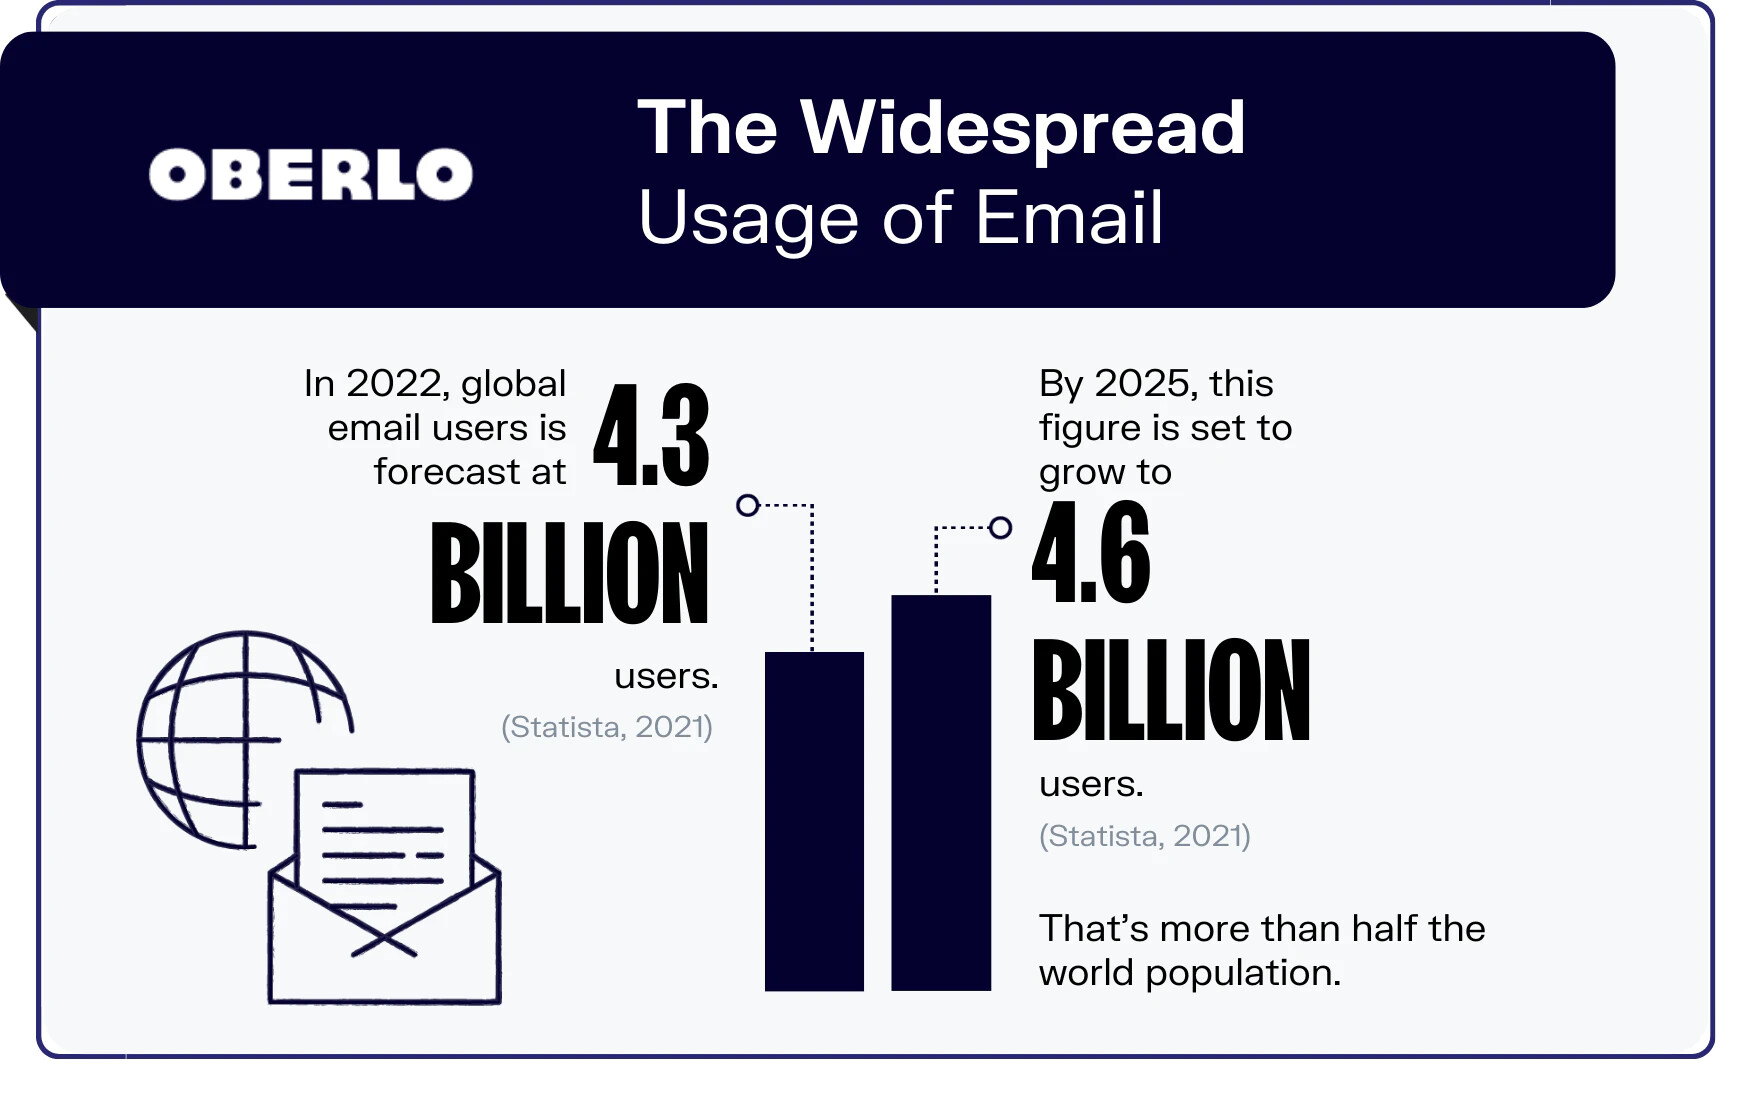
Circa 2022, the number of email users worldwide was estimated to be 4.3 billion (Statista, 2021). This figure is set to grow to 4.6 billion by 2025, making up more than half of the expected world population.
Source: 10 Email Marketing Statistics You Need to Know in 2023
Implications
Each of these user is vulnerable to phishing attacks that leverage socially engineered identity unclarity that can be reduced via the use of digitally signed and/or encrypted mails using the S/MIME protocol.
Market research shows that Apple Mail and GMAIL are the dominant Email apps, both having an installed base in excess of 1 Billion active email accounts each.

Source: How Many Email Users Are There in 2023 | 99firms
Bearing in mind the virtues of S/MIME outlined above, Apple Mail is the only one these two Email App behemoths that supports the aforementioned protocol for Email Sender Identity Authenticity.
The rest of this post demonstrates the use of CHAT-GPT for generating and repurposing information en route to a better understanding of how S/MIME is implemented in Apple Mail.
Note:
For maximum impact, especially in regards to generated Tables and Knowledge Graphs, you are encouraged to read this post using a browser that includes the OpenLink Structured Data Sniffer (OSDS) extension (available for Chrome, Edge, Firefox, Safari and others) – thereby enabling you lift the data and information generated into a live Semantic Web that can be saved to any DBMS that supports the SPARQL Query Language & Protocol.
CHAT-GPT Transcript
Q:
Using a Mermaid Sequence Diagram, from the perspective of Apple Mail (iOS and macOS) where the digital certificate and associated private key are stored in the OS keychain, explain how S/MIME is used to send digitally signed emails.
A:
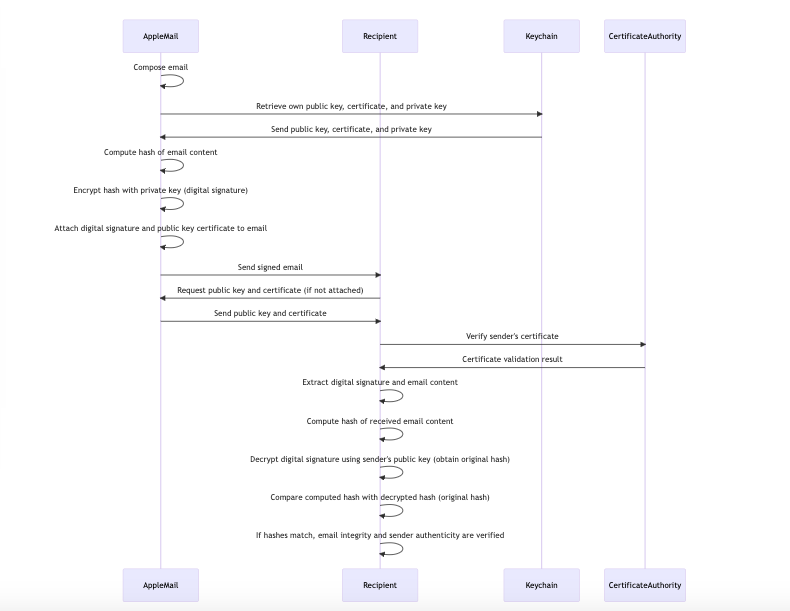
Here is a Mermaid sequence diagram illustrating how S/MIME is used to send digitally signed emails using Apple Mail (iOS and macOS), with the digital certificate and associated private key stored in the OS keychain:
sequenceDiagram
    participant AppleMail
    participant Recipient
    participant Keychain
    participant CertificateAuthority

    AppleMail->>AppleMail: Compose email
    AppleMail->>Keychain: Retrieve own public key, certificate, and private key
    Keychain->>AppleMail: Send public key, certificate, and private key
    AppleMail->>AppleMail: Compute hash of email content
    AppleMail->>AppleMail: Encrypt hash with private key (digital signature)
    AppleMail->>AppleMail: Attach digital signature and public key certificate to email
    AppleMail->>Recipient: Send signed email
    Recipient->>AppleMail: Request public key and certificate (if not attached)
    AppleMail->>Recipient: Send public key and certificate
    Recipient->>CertificateAuthority: Verify sender's certificate
    CertificateAuthority->>Recipient: Certificate validation result
    Recipient->>Recipient: Extract digital signature and email content
    Recipient->>Recipient: Compute hash of received email content
    Recipient->>Recipient: Decrypt digital signature using sender's public key (obtain original hash)
    Recipient->>Recipient: Compare computed hash with decrypted hash (original hash)
    Recipient->>Recipient: If hashes match, email integrity and sender authenticity are verified
Here’s the live Mermaid Sequence Diagram.
Mermaid Sequence Diagram
Explanation
Mermaid sequence diagram provides a high-level overview of how S/MIME is used to send digitally signed emails using Apple Mail (iOS and macOS) with the digital certificate and associated private key stored in the OS keychain. There are more detailed aspects and variations to the process that are not depicted here.
AppleMailcomposes the email.AppleMailretrieves its own public key, certificate, and private key from theKeychain.- The
Keychainsends the public key, certificate, and private key toAppleMail. AppleMailcomputes a hash of the email content.AppleMailencrypts the hash with the private key, creating a digital signature.AppleMailattaches the digital signature and the public key certificate to the email.AppleMailsends the signed email to theRecipient.- If the public key and certificate are not attached to the email, the
Recipientrequests them fromAppleMail. AppleMailsends the public key and certificate to theRecipient.- The
Recipientverifies the sender’s certificate with theCertificateAuthority. - The
CertificateAuthoritysends the certificate validation result to theRecipient. - The
Recipientextracts the digital signature and email content. - The
Recipientcomputes a hash of the received email content. - The
Recipientdecrypts the digital signature using the sender’s public key, obtaining the original hash. - The
Recipientcompares the computed hash with the decrypted hash (original hash). - If the hashes match, the
Recipientconfirms the email’s integrity and the sender’s authenticity.
Q:
Also create a rendition of the steps using a Table in Markdown form that includes ## Markdown Start ## and ## Markdown End ##
A:
| Position | Step |
|---|---|
| 1 | Compose email |
| 2 | Retrieve own public key, certificate, and private key from Keychain |
| 3 | Compute hash of email content |
| 4 | Encrypt hash with private key (digital signature) |
| 5 | Attach digital signature and public key certificate to email |
| 6 | Send signed email to Recipient |
| 7 | Request public key and certificate (if not attached) |
| 8 | Send public key and certificate |
| 9 | Verify sender’s certificate with Certificate Authority |
| 10 | Extract digital signature and email content |
| 11 | Compute hash of received email content |
| 12 | Decrypt digital signature using sender’s public key (obtain original hash) |
| 13 | Compare computed hash with decrypted hash (original hash) |
| 14 | Confirm email integrity and sender authenticity if hashes match |
Q:
Generate an RDF-Turtle rendition, in HowTo and Step-By Guide form, using the following guidelines:
- place code within
## Turtle Start ##and## Turtle End ##block - terms from Schema.org
- ensure each step is named via a schema:name attribute
- use schema:position and schema:nextItem for enhanced indexing and flow
- relative hash-based IRIs ( e.g., <#> ) for subject and object denotation
- include DBpedia cross-references where such exist, bearing in mind this is about pki, cryptography, privacy, email, identity, and privacy
A:
## Turtle Start ##
@base <> .
@prefix schema: <http://schema.org/> .
@prefix dbpedia: <http://dbpedia.org/resource/> .
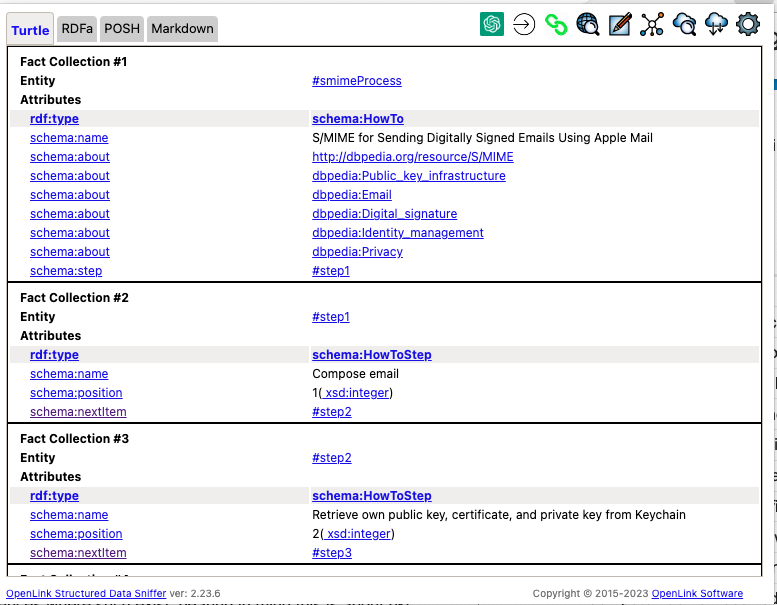
<#smimeProcess> a schema:HowTo ;
schema:name "S/MIME for Sending Digitally Signed Emails Using Apple Mail" ;
schema:about dbpedia:S\/MIME, dbpedia:Public_key_infrastructure, dbpedia:Email, dbpedia:Digital_signature, dbpedia:Identity_management, dbpedia:Privacy ;
schema:step <#step1> .
<#step1> a schema:HowToStep ;
schema:name "Compose email" ;
schema:position 1 ;
schema:nextItem <#step2> .
<#step2> a schema:HowToStep ;
schema:name "Retrieve own public key, certificate, and private key from Keychain" ;
schema:position 2 ;
schema:nextItem <#step3> .
<#step3> a schema:HowToStep ;
schema:name "Compute hash of email content" ;
schema:position 3 ;
schema:nextItem <#step4> .
<#step4> a schema:HowToStep ;
schema:name "Encrypt hash with private key (digital signature)" ;
schema:position 4 ;
schema:nextItem <#step5> .
<#step5> a schema:HowToStep ;
schema:name "Attach digital signature and public key certificate to email" ;
schema:position 5 ;
schema:nextItem <#step6> .
<#step6> a schema:HowToStep ;
schema:name "Send signed email to Recipient" ;
schema:position 6 ;
schema:nextItem <#step7> .
<#step7> a schema:HowToStep ;
schema:name "Request public key and certificate (if not attached)" ;
schema:position 7 ;
schema:nextItem <#step8> .
<#step8> a schema:HowToStep ;
schema:name "Send public key and certificate" ;
schema:position 8 ;
schema:nextItem <#step9> .
<#step9> a schema:HowToStep ;
schema:name "Verify sender's certificate with Certificate Authority" ;
schema:position 9 ;
schema:nextItem <#step10> .
<#step10> a schema:HowToStep ;
schema:name "Extract digital signature and email content" ;
schema:position 10 ;
schema:nextItem <#step11> .
<#step11> a schema:HowToStep ;
schema:name "Compute hash of received email content" ;
schema:position 11 ;
schema:nextItem <#step12> .
<#step12> a schema:HowToStep ;
schema:name "Decrypt digital signature using sender's public key (obtain original hash)" ;
schema:position 12 ;
schema:nextItem <#step13> .
<#step13> a schema:HowToStep ;
schema:name "Compare computed hash with decrypted hash (original hash)" ;
schema:position 13 ;
schema:nextItem <#step14> .
<#step14> a schema:HowToStep ;
schema:name "Confirm email integrity and authenticity" ;
schema:position 14 ;
schema:nextItem <#step15> .
<#step15> a schema:HowToStep ;
schema:name "Display verified email to the recipient" ;
schema:position 15 .
## Turtle End ##
OpenLink Structured Data Sniffer Screenshot
OpenLink Structured Data Sniffer Options
- …for Chrome, Brave, Opera, and other compatible browsers
- …for Firefox
- …for Safari
- …for iOS on iPhone or iPad
Related
- HowTo – Using CHAT-GPT to Generate a Sequence Diagram & Knowledge Graph about the TLS Protocol using CHAT-GPT
- HowTo – Using CHAT-GPT to Generate a Sequence Diagram & Knowledge Graph about the TLS Protocol using CHAT-GPT
- HowTo — Using CHAT-GPT to generate a Knowledge Graph from a Mermaid Entity Relationship Model
- ChatGPT Nanotations Collections – these docs combine prompts and the structured data generated by answers that double as LOD Cloud Knowledge Graph and Semantic Web entry points
- ChatGPT Prompt Collection
- ChatGPT Prompt Collection RSS Feed
- ChatGPT Prompt Collection Atom Feed