Setting up a Virtuoso-Hosted HTTPS Endpoint
Virtuoso provides two options for credentials storage required for HTTPS site deployment.
Prerequisites
You’ll need credentials for your site which comprise the following:
- an X.509 Certificate — which comprises a Public Key
- a Private Key
These credentials may be bundled in a single PKCS#12 or secure PEM file, or delivered separately, in which case the private key is delivered in secure PEM format.
Filesystem Configuration
This simply requires the creation (or editing) of INI file entries that denote the server port (SSLPort; 443 is the default ) and either a single secure PEM file holding both the X.509 certificate and the public key (both SSLCertificate and SSLPrivateKey get set to the same) or individual X.509 certificate (SSLCertificate) and public key (SSLPrivateKey) files.
These .cer, .crt, and .pem files must be within the Virtuoso instance’s working directory, either at root or in a subdirectory. If in a subdirectory, the INI settings should specify the relative path to the relevant file (e.g., ./keys/keys.pem) rather than the bare filename (e.g., keys.pem).
Filesystem Hosted Credentials
If your site credentials are bundled in a secure PKCS#12 file, typically named with the .p12 extension, simply extract the Certificate and Private Key to .cer (or .crt) and .pem files, respectively.
Single PEM File Approach
If your site credentials (Certificate and Private Key) are bundled in a secure PEM file named, for instance, keys.pem, here are INI entry examples:
[HTTPServer]
SSLPort                  = 443
SSLCertificate           = keys.pem
SSLPrivateKey            = keys.pem
SSLExtraChainCertificate = IntermediateCA.cer
X509ClientVerifyCAFile   = digicert_chain.pem
X509ClientVerify         = 3
X509ClientVerifyDepth    = 15
Separate Certificate and Private Key Approach
If your site credentials (Certificate and Private Key) are in separate files, i.e., a .cer or .crt for the X.509 certificate and a secure .pem for the private key, here are INI entry examples:
[HTTPServer]
SSLPort                  = 443
SSLCertificate           = certificate.cer
SSLPrivateKey            = private-key.pem
SSLExtraChainCertificate = IntermediateCA.cer
X509ClientVerifyCAFile   = digicert_chain.pem
X509ClientVerify         = 3
X509ClientVerifyDepth    = 15
Virtuoso Credentials Store Approach
If your site credentials have been imported to Virtuoso’s DB-hosted credentials store, here are INI entry examples:
[HTTPServer]
SSLPort                  = 443
SSLCertificate           = db:certificate
SSLPrivateKey            = db:private-key
SSLExtraChainCertificate = IntermediateCA.cer
X509ClientVerifyCAFile   = digicert_chain.pem
X509ClientVerify         = 3
X509ClientVerifyDepth    = 15
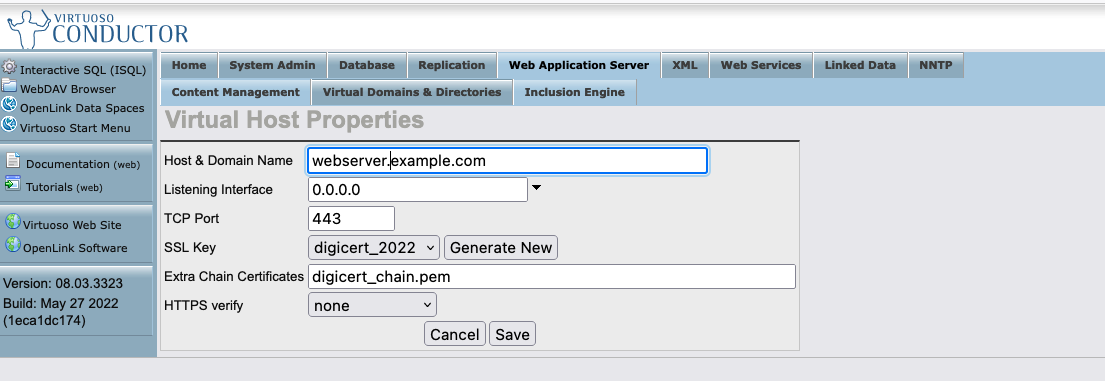
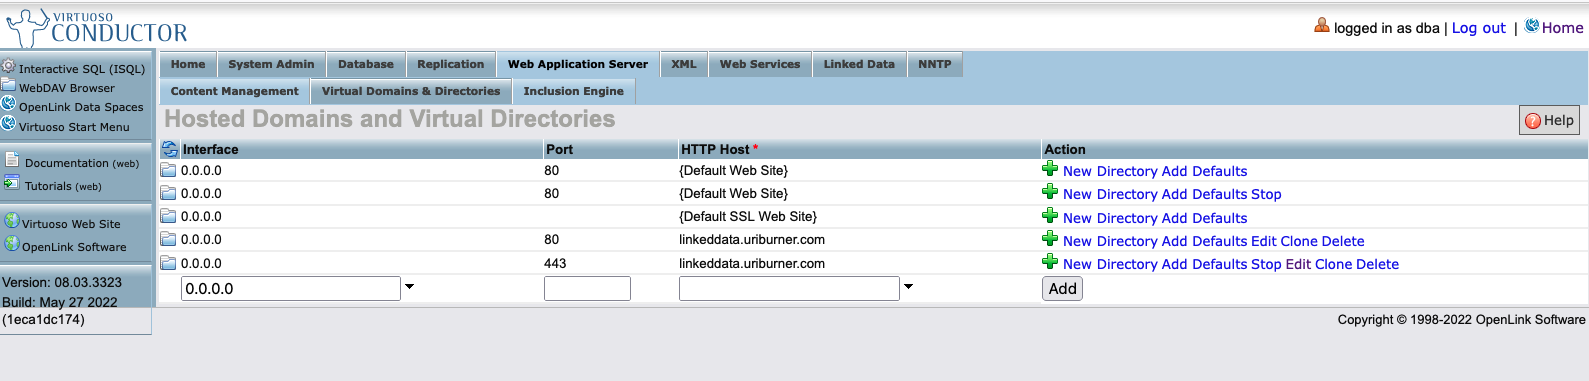
WebDAV Hosted Site
Use the Web Application Server → Virtual Domains and Directories menu to perform the following tasks:
-
Create a Virtual Domain comprising a port (typically
443), Domain Name, Port, SSL Key (select or generate a new one), Additional Trust Chain, and HTTPS Verify mode
-
Save
-
Ensure the new domain is live, i.e., it has a functioning listener on the chosen port,
443or otherwise
Additional Notes
-
The
X509ClientVerifyCAFileshould only be set when theX509ClientVerifyis1(meaning client verification is mandatory), whenX509ClientVerifyCAFileshould refer to a semi-colon separated list of certificates used to verify clients. Mandatory client verification isn’t common practice since it makes HTTPS connections overly restrictive while increasing the size ofDN(Distinguished Name) values which are ultimately sent to a client during a TLS-handshake, and which therefore need to be kept as short as possible. -
The
SSLExtraChainCertificateis used in a TLS-handshake when the server’s certificate is not directly linked in the well known CA Root list configured in the server’s host operating system