Overview
This guide walks you through the installation of the Enterprise Edition JDBC to JDBC Bridge Driver on a Linux host. The host acts as a client to a remote database accessible via its native JDBC driver.
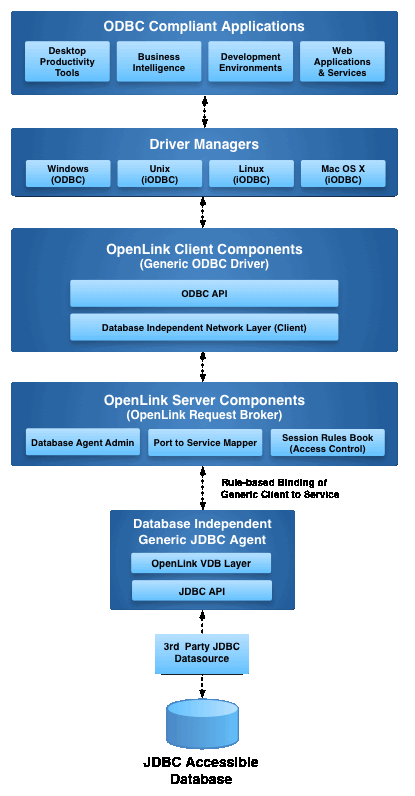
Enterprise Architecture
The JDBC to JDBC Bridge enables Java applications to connect to remote JDBC-accessible databases through OpenLink’s multi-tier architecture, providing enhanced security, scalability, and centralized configuration.

Step 1: Download the Installer Archive
Use the following commands to download the required installation files:
curl -O https://download3.openlinksw.com/uda/components/misc/install.sh
curl -O https://download3.openlinksw.com/uda/components/9.0/x86_64-generic-linux-glibc25-64/opljdbc.taz
curl -O https://download3.openlinksw.com/uda/components/9.0/x86_64-generic-linux-glibc25-64/jdbc_sv.taz
curl -O https://download3.openlinksw.com/uda/components/9.0/x86_64-generic-linux-glibc25-64/oplrqb.taz
Step 2: Pre-Installation Configuration
Ensure the following prerequisites are met:
- A 64-bit JVM must be installed and configured.
- A
third-party or native JDBC driversthat connects to the target database must be available - The JDBC Driver must be installed on the same machine as the Multi-Tier “Enterprise” Edition Request Broker and Bridge Agent(s) for JDBC Data Sources.
- The JDBC driver jar file (or a symbolic link to it) must be included in the active
CLASSPATHenvironment variable. - The JDBC driver
class namemust be known. - The JDBC
connection URLthat connects to your target JDBC Data Source must be known. - The location of the
libjvm.soshared library using by the OpenLink JDBC Bridge agent must be set in theLD_LIBRARY_PATHenvironment variable - Generally, the latest JVM from http://java.com/ is the best choice.
Step 3: Installation
- Log onto the target machine for the installation and create a suitable OpenLink installation directory
{OPENLINK_INSTALL}. - Copy all the downloaded components to the
{OPENLINK_INSTALL}directory, which are theinstall.sh,oplrqb.taz,opljdbc.taz,odbc_admin.taz,jdbc_sv.tazfiles. - Install OpenLink components using the
install.shshell script with the command –
sh install.sh
- Take care to enter correct information when prompted pertaining to ports, passwords, etc and ensure that you note these down for future use.
- The installation should finish without error.
Step 4: Configuration
- To setup the OpenLink environment, from the
{OPENLINK_INSTALL}run the command –
. ./openlink.sh
- Open the file
{OPENLINK_INSTALL}/bin/oplrqb.iniwith a suitable text editor such asvi. - Locate the
[Environment JDBC18]section for setting the driver specific JDBC configuration and edit to reflect your environment, setting theCLASSPATHto the location of the JDBC Driver jar file and theLD_LIBRARY_PATHto the location of thelibjvm.soshared library determined inStep 2–
[Environment JDBC18]
CLASSPATH          = {JDBC Driver JAR file}
LD_LIBRARY_PATH = {Directory of libjvm.so file}
;; PATCHNULLSIZEOFSQLCHAR = 4096
;; SQL_DBMS_NAME = hugh
- Place the License file(s) (
oplrqb.lic, jdbc.lic) either purchased or obtain during the evaluation download process in the{OPENLINK_INSTALL}/bindirectory. - Start the OpenLink License Manage (
oplmgr) by going to the{OPENLINK_INSTALL}/bindirectory and running the command –
./oplmgr +start
- Start the OpenLink Request Broker (
oplrqb) by going to the{OPENLINK_INSTALL}/bindirectory and running the command –
./oplrqb -v     ;;; To start in background mode
or
./oplrqb -fd    ;;; To start in foreground debug mode
Step 5: Configure JDBC Connection
Create a Java application or use a JDBC test utility to connect using the OpenLink JDBC driver (opljdbc4_2.jar ).
Type 3 JDBC URL Syntax
The Type 3 JDBC URL syntax is as shown below. Spaces between arguments are here only for clarity; they should be omitted for actual use.
jdbc:openlink://<Hostname>[:portnumber] [/DSN=<dsn>] [/UID=<uid>] [/PWD=<pwd>] [/READONLY=<y>]
              [/FBS=<x>] [/JDBCAGENT=<AgentType>] [/SVT=<ServerType>] [/DATABASE=<Schema>]
              [/OPTIONS=<AgentOptions>] [/DRIVER=<RemoteOdbcDriver>] [/SSL=<y>] [/TIMEOUT=<seconds>]
Sample JDBC Connection Code (Java)
Class.forName("openlink.jdbc4.Driver");
Connection conn = DriverManager.getConnection(
  "jdbc:openlink://localhost:5000/SVT=JDBC18/DATABASE={JDBC Driver Class Name}/OPTIONS={JDBC connection URL}/READONLY=N/FBS=99/", "username", "password"
);
Statement stmt = conn.createStatement();
ResultSet rs = stmt.executeQuery("SELECT COUNT(*) FROM {table-name}");
while (rs.next()) {
    System.out.println("Count: " + rs.getInt(1));
}
Replace
localhost:5000with the actual host and port of the Request Broker (oplrqb).
Step 6: Test the Connection
You can use any JDBC-compatible test tool (e.g., SQuirreL SQL, DBeaver, or a custom Java app) to verify connectivity.
Ensure:
- The OpenLink JDBC driver (
opljdbc4_2.jar) is in theCLASSPATHenvironment variable. - The JDBC URL is correctly formatted.
- The Request Broker is running and accessible.