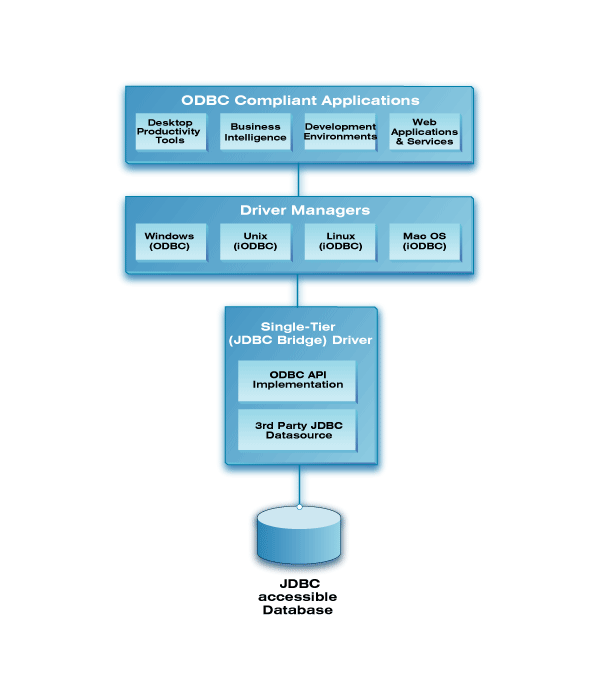
This installation guide walks you through the installation of the Lite Edition ODBC to JDBC Bridge Driver to a Personal or Application Server host functioning as a client to a database that’s accessible via its native JDBC Driver.
Step 1: Download the Installer Archive
- Visit the OpenLink ODBC Lite Edition Driver Download Page to download the appropriate ODBC driver for Informix.
- Alternatively,
curlcan be used to download the installer archives andinstall.shscript directly:
curl -O https://download3.openlinksw.com/uda/components/misc/install.sh
curl -O https://download3.openlinksw.com/uda/components/9.0/x86_64-generic-linux-glibc25-64/jdbc_lt.taz
curl -O https://download3.openlinksw.com/uda/components/9.0/x86_64-generic-linux-glibc25-64/odbc_admin.taz
Step 2: Pre-Installation Configuration
- A 64-bit JVM must be installed and configured.
- A
third-party or native JDBC driversthat connects to the target database must be available - The JDBC Driver must be installed on the same machine as the Multi-Tier “Enterprise” Edition Request Broker and Bridge Agent(s) for JDBC Data Sources.
- The JDBC driver jar file (or a symbolic link to it) must be included in the active
CLASSPATHenvironment variable. - The JDBC driver
class namemust be known. - The JDBC
connection URLthat connects to your target JDBC Data Source must be known. - The location of the
libjvm.soshared library using by the OpenLink JDBC Bridge agent must be set in theLD_LIBRARY_PATHenvironment variable - Generally, the latest JVM from http://java.com/ is the best choice.
Step 3: Installation
- Log onto the target machine for the installation and create a suitable OpenLink installation directory
{OPENLINK_INSTALL}. - Copy all the downloaded components to the
{OPENLINK_INSTALL}directory, which are theinstall.sh,odbc_admin.taz,jdbc_lt.tazfiles. - Install OpenLink components using the
install.shshell script with the command –
sh install.sh
- Take care to enter correct information when prompted pertaining to ports, passwords, etc and ensure that you note these down for future use.
- The installation should finish without error.
Step 4: Configuration
- Open the file
{OPENLINK_INSTALL}/openlink.shwith a suitable text editor such asvi. - Locate the
LD_LIBRARY_PATHshared library environment variable setting and set to point the location of the requiredlibjvm.soshared library determined inStep 2–
LD_LIBRARY_PATH = {Path to libjvm.so file}:$LD_LIBRARY_PATH
- To setup the OpenLink environment, from the
{OPENLINK_INSTALL}run the command –
. ./openlink.sh
- Open the file
{OPENLINK_INSTALL}/bin/openlink.iniwith a suitable text editor such asvi. - Locate the
[Environment Jdbc1.8]section for setting the driver specific JDBC configuration and edit to reflect your environment, setting theCLASSPATHto the location and name of the JDBC Driver jar file determined inStep 2–
[Environment Jdbc 1.8]
CLASSPATH         = {JDBC Driver JAR file}:.
- Place the License file (
jdbc_lt.lic) either purchased or obtain during the evaluation download process in the{OPENLINK_INSTALL}/bindirectory. - Start the OpenLink License Manage (
oplmgr) by going to the{OPENLINK_INSTALL}/bindirectory and running the command –
./oplmgr +start
Step 5: Create Data Source Name (DSN)
- Open the file
{OPENLINK_INSTALL}/bin/odbc.iniwith a suitable text editor such asvi. - Locate and edit the sample OpenLink ODBC -JDBC Bridge data source (DSN) called
[jdbc18_lite_unicode]created during the installation process and edit as follows –
[jdbc18_lite_unicode]
Driver          = {OPENLINK_INSTALL}/lib/jdbc18_mt_lu.so
ServerType      = Jdbc 1.8
Username        = {username}
Password        =  {optional password}
Database        = {JDBC Driver class name}
Options         = {JDBC connection URL string}
FetchBufferSize = 99
ReadOnly        = no
DeferLongFetch  = no
JetFix          = no
WideAsUTF16 = Y
Description     = Sample Jdbc 1.8 Lite Connection
Replace items in curly brackets ie {...} with the actual values for the target JDBC accessible database determined in Step 2 above.
Step 6: Test connection
Using the iODBC Runtime Environment
- Use the OpenLink iODBC
iodbctestsample tool packaged with the HTTP-based OpenLink ODBC Administrator as follows to make a test connection –
$ cd {OPENLINK_INSTALL}
$. ./openLink.sh
$ iodbctest "DSN=jdbc18_lite_unicode;UID={username};PWD=xxxxxxxx"
iODBC Demonstration program
This program shows an interactive SQL processor
Driver Manager: 03.52.0507.0105
Driver: 08.02.1217 OpenLink Generic ODBC Driver (oplodbc.so)

SQL>
- SQL statements can now be issued directly against the target database from the
SQL>prompt –
SQL> select count(*) from orders

(count(*))
-----------------
23

 result set 1 returned 1 rows.

SQL>
- The ODBC to JDBC Bridge Driver is now ready for use with target ODBC application(s).
Using the unixODBC Runtime Environment
- When using the unixODBC Driver Manager the
WideAsUTF16 = Yparameter needs to be added to the target ODBC DSN, if not in place already, to enable successful connections with applications built using the unixODBC SDK, e.g., itsisqltest application –
$ isql jdbc18_lite_unicode {username} {password}
+---------------------------------------+
| Connected!                            |
|                                       |
| sql-statement                         |
| help [tablename]                      |
| echo [string]                         |
| quit                                  |
|                                       |
+---------------------------------------+
SQL> select count(*) from orders
+------------------+
| (count(*))       |
+------------------+
| 23               |
+------------------+
SQLRowCount returns -1
1 rows fetched
SQL>