0 - Pre Installation Preparation
If you are upgrading an existing Virtuoso installation and want to preserve your existing data and configuration files:
-
Shut down your Virtuoso instance as normal.
-
Right-click on the existing Virtuoso.app (exact name may vary), and select Show Package Contents .
-
Drill down to Contents → virtuoso → database .
-
Check the size of the
virtuoso.trxfile, found in the database folder alongside thevirtuoso.dbandvirtuoso.inifiles.
-
If zero bytes, proceed to step 6.
-
If larger than zero bytes, start the instance from the command line with the extra argument, "
+checkpoint-only", and recheck.trxfile size – expecting zero bytes. -
If larger
.trxfiles persist, contact Technical Support.
- Make a backup of your existing Virtuoso Database and Configuration files (defaults are
virtuoso.dbandvirtuoso.ini) prior to performing the steps that follow. You can simply Option-drag (to force a copy) yourvirtuoso.dbandvirtuoso.inifiles to your Desktop, Documents folder, or other preferred location. Note: Virtuoso’s online backup feature, if enabled, should have already generated a backup-set.
1 - Download and Install Virtuoso
- Download the Virtuoso 8.x DMG archive (mwvpz2zz.dmg) from the download site. Note: Virtuoso 8.x requires OS X Lion (10.9) or later.
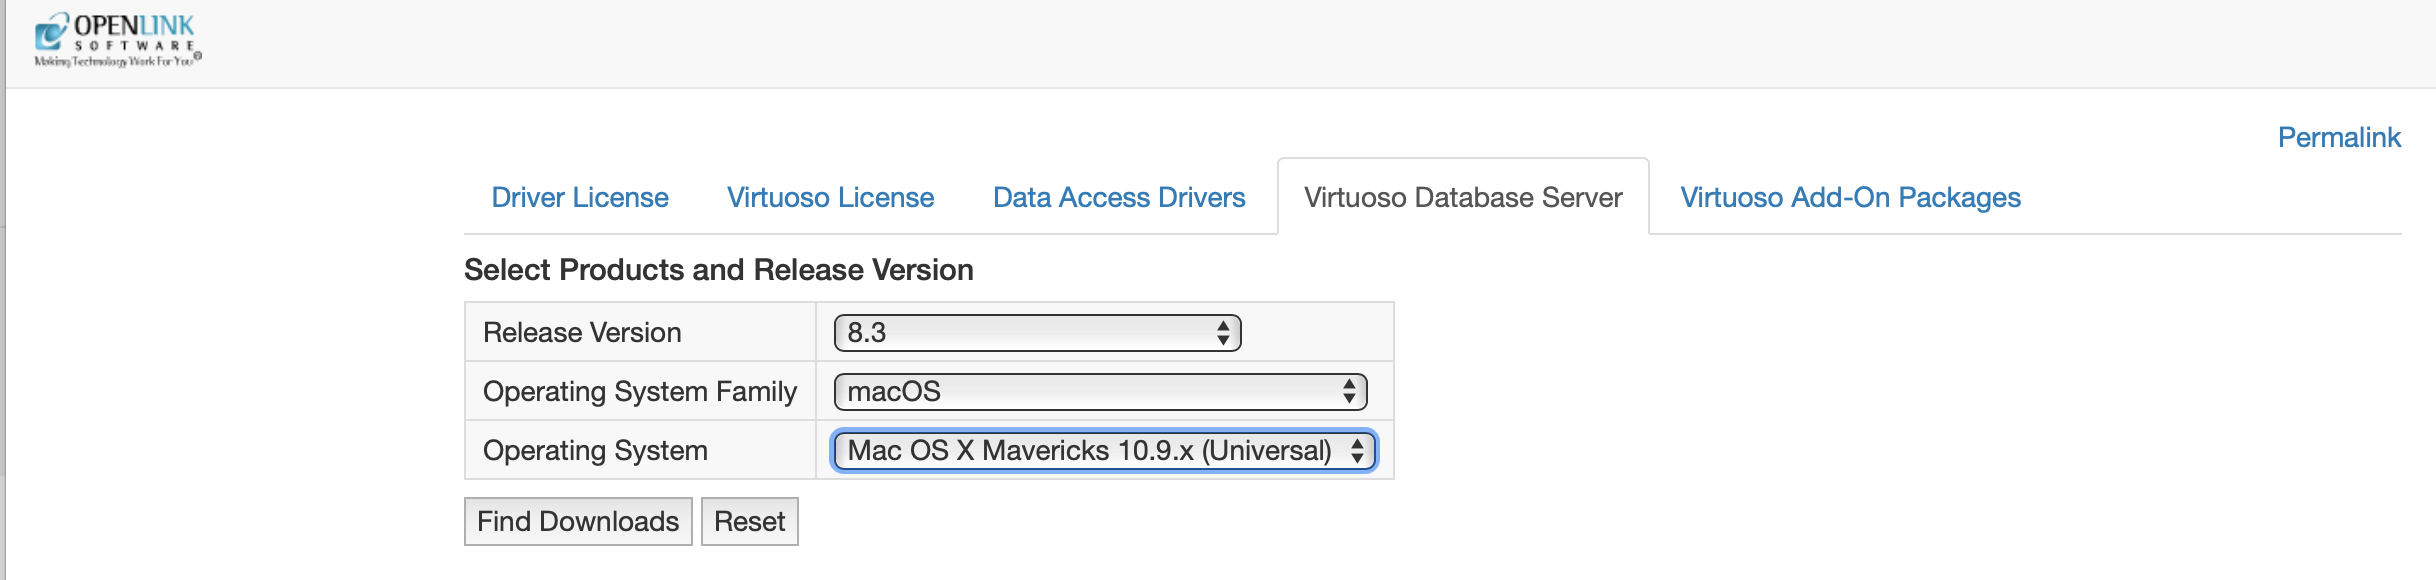
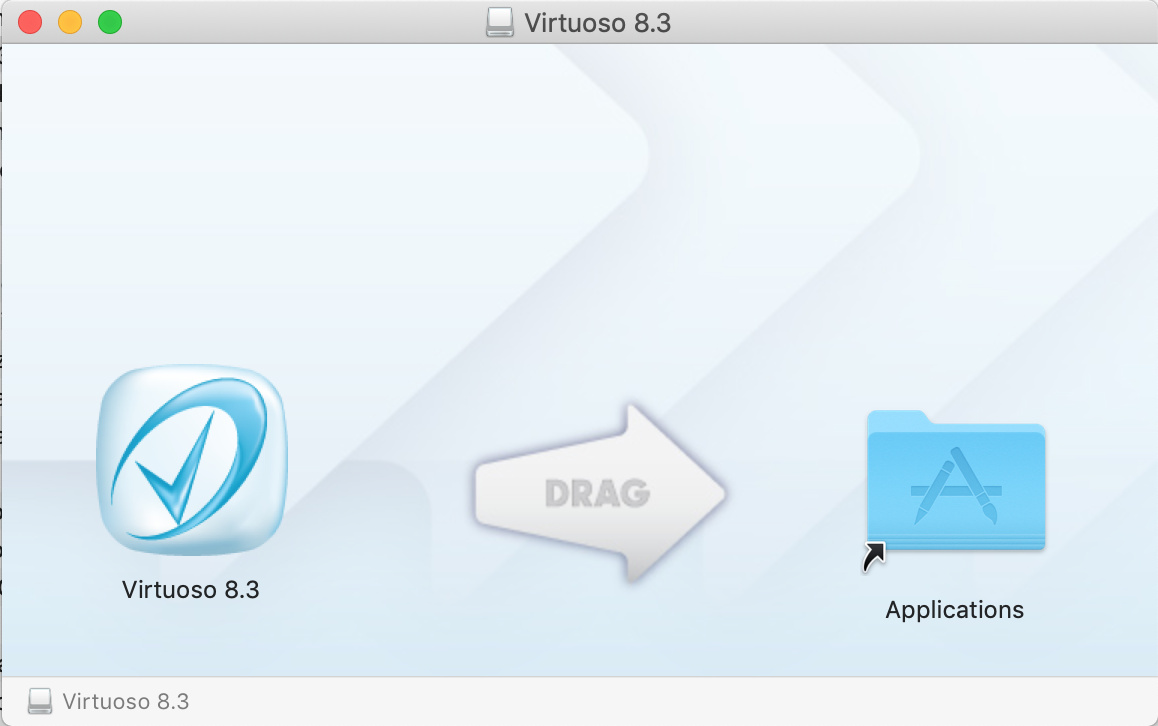
- Open the
mwvpz2zz.dmgfile, and drag the Virtuoso 8.3.app into your Applications folder or other preferred location.
- Once the copy is complete, you can Eject the Virtuoso 8.3 disk, and discard or retain the
mwvpz2zz.dmgfile as you prefer.
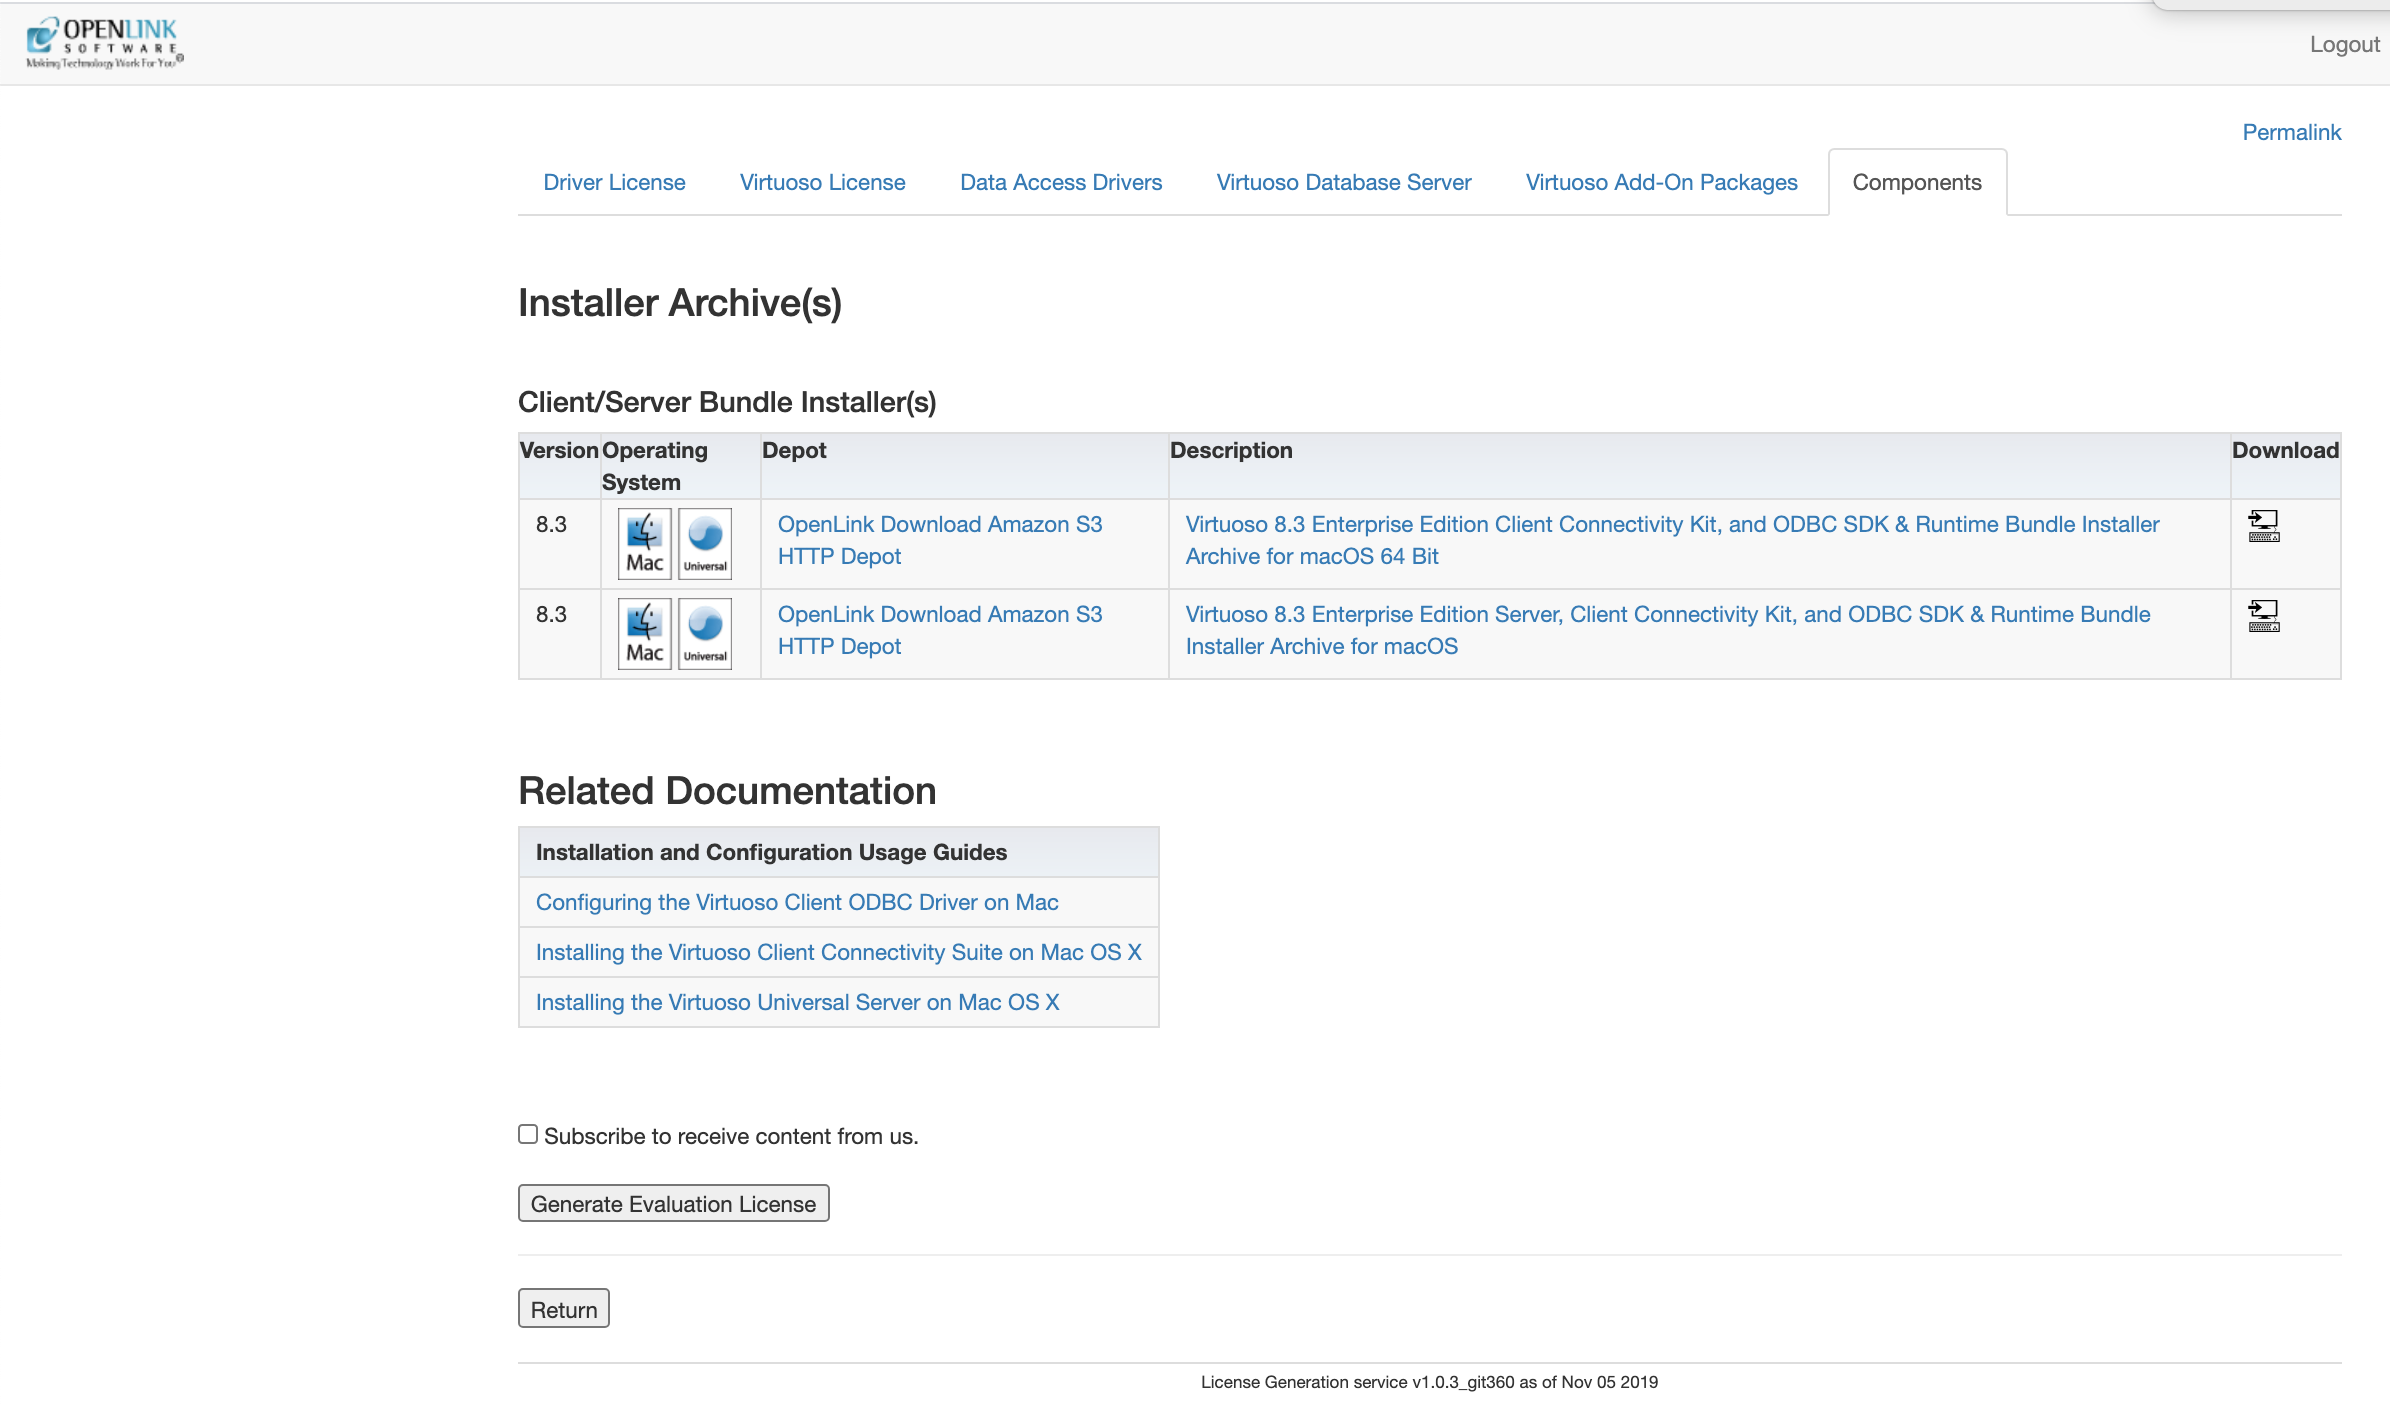
2 - Obtain a License File
- If you haven’t already obtained a suitable Virtuoso 8.x license file, return to the download site
click on the Generate Evaluation License button from step 1 to obtain a Free 30 Day Evaluation License will be generated and emailed to your email account.

- In addition, a copy of the license file will also be stored in your OpenLink Data Spaces Briefcase folder.

Note – the file must be named virtuoso.lic for use. Some browsers may rename the file during download; you can simply rename the file on your machine.
3 - Start and Locate the Virtuoso Monitor
-
Double-click the Virtuoso 8.3.app icon in the Applications folder to trigger installation and startup of helper tools – the Virtuoso Monitor and OpenLink License Manager .
-
Locate the Virtuoso Monitor in your menu bar – it’s the V icon toward the right.
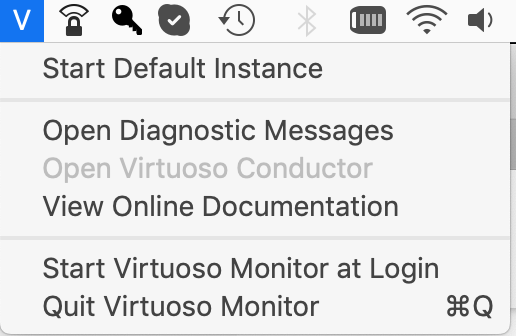
- You may also choose to automatically Start Virtuoso Monitor at Login , or you may prefer to manually start it when needed (by double-clicking Virtuoso 8.3.app , as you just did).
4 - Apply your License File
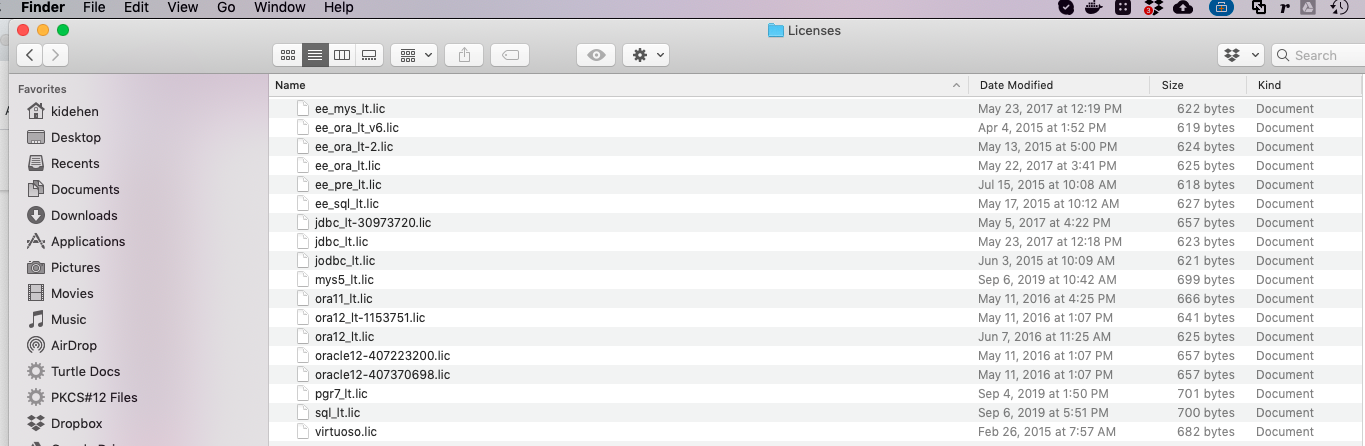
- In the Finder’s Go menu, select Go to Folder… , and input '/Library/Application Support/OpenLink/Licenses`

- Drag the license file (
virtuoso.lic) you downloaded above into this folder.
- You may receive a prompt, Modifying “Licenses” requires an administrator name and password. If so, click the Authenticate button, and input a Mac OS X administrator’s username and password.
5 - Start and Administer your Virtuoso Instance
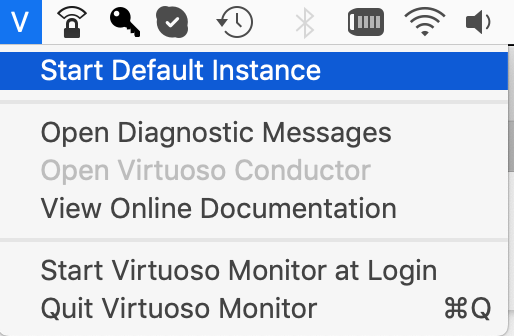
- Open the Virtuoso Monitor menu, and select Start Default Instance .
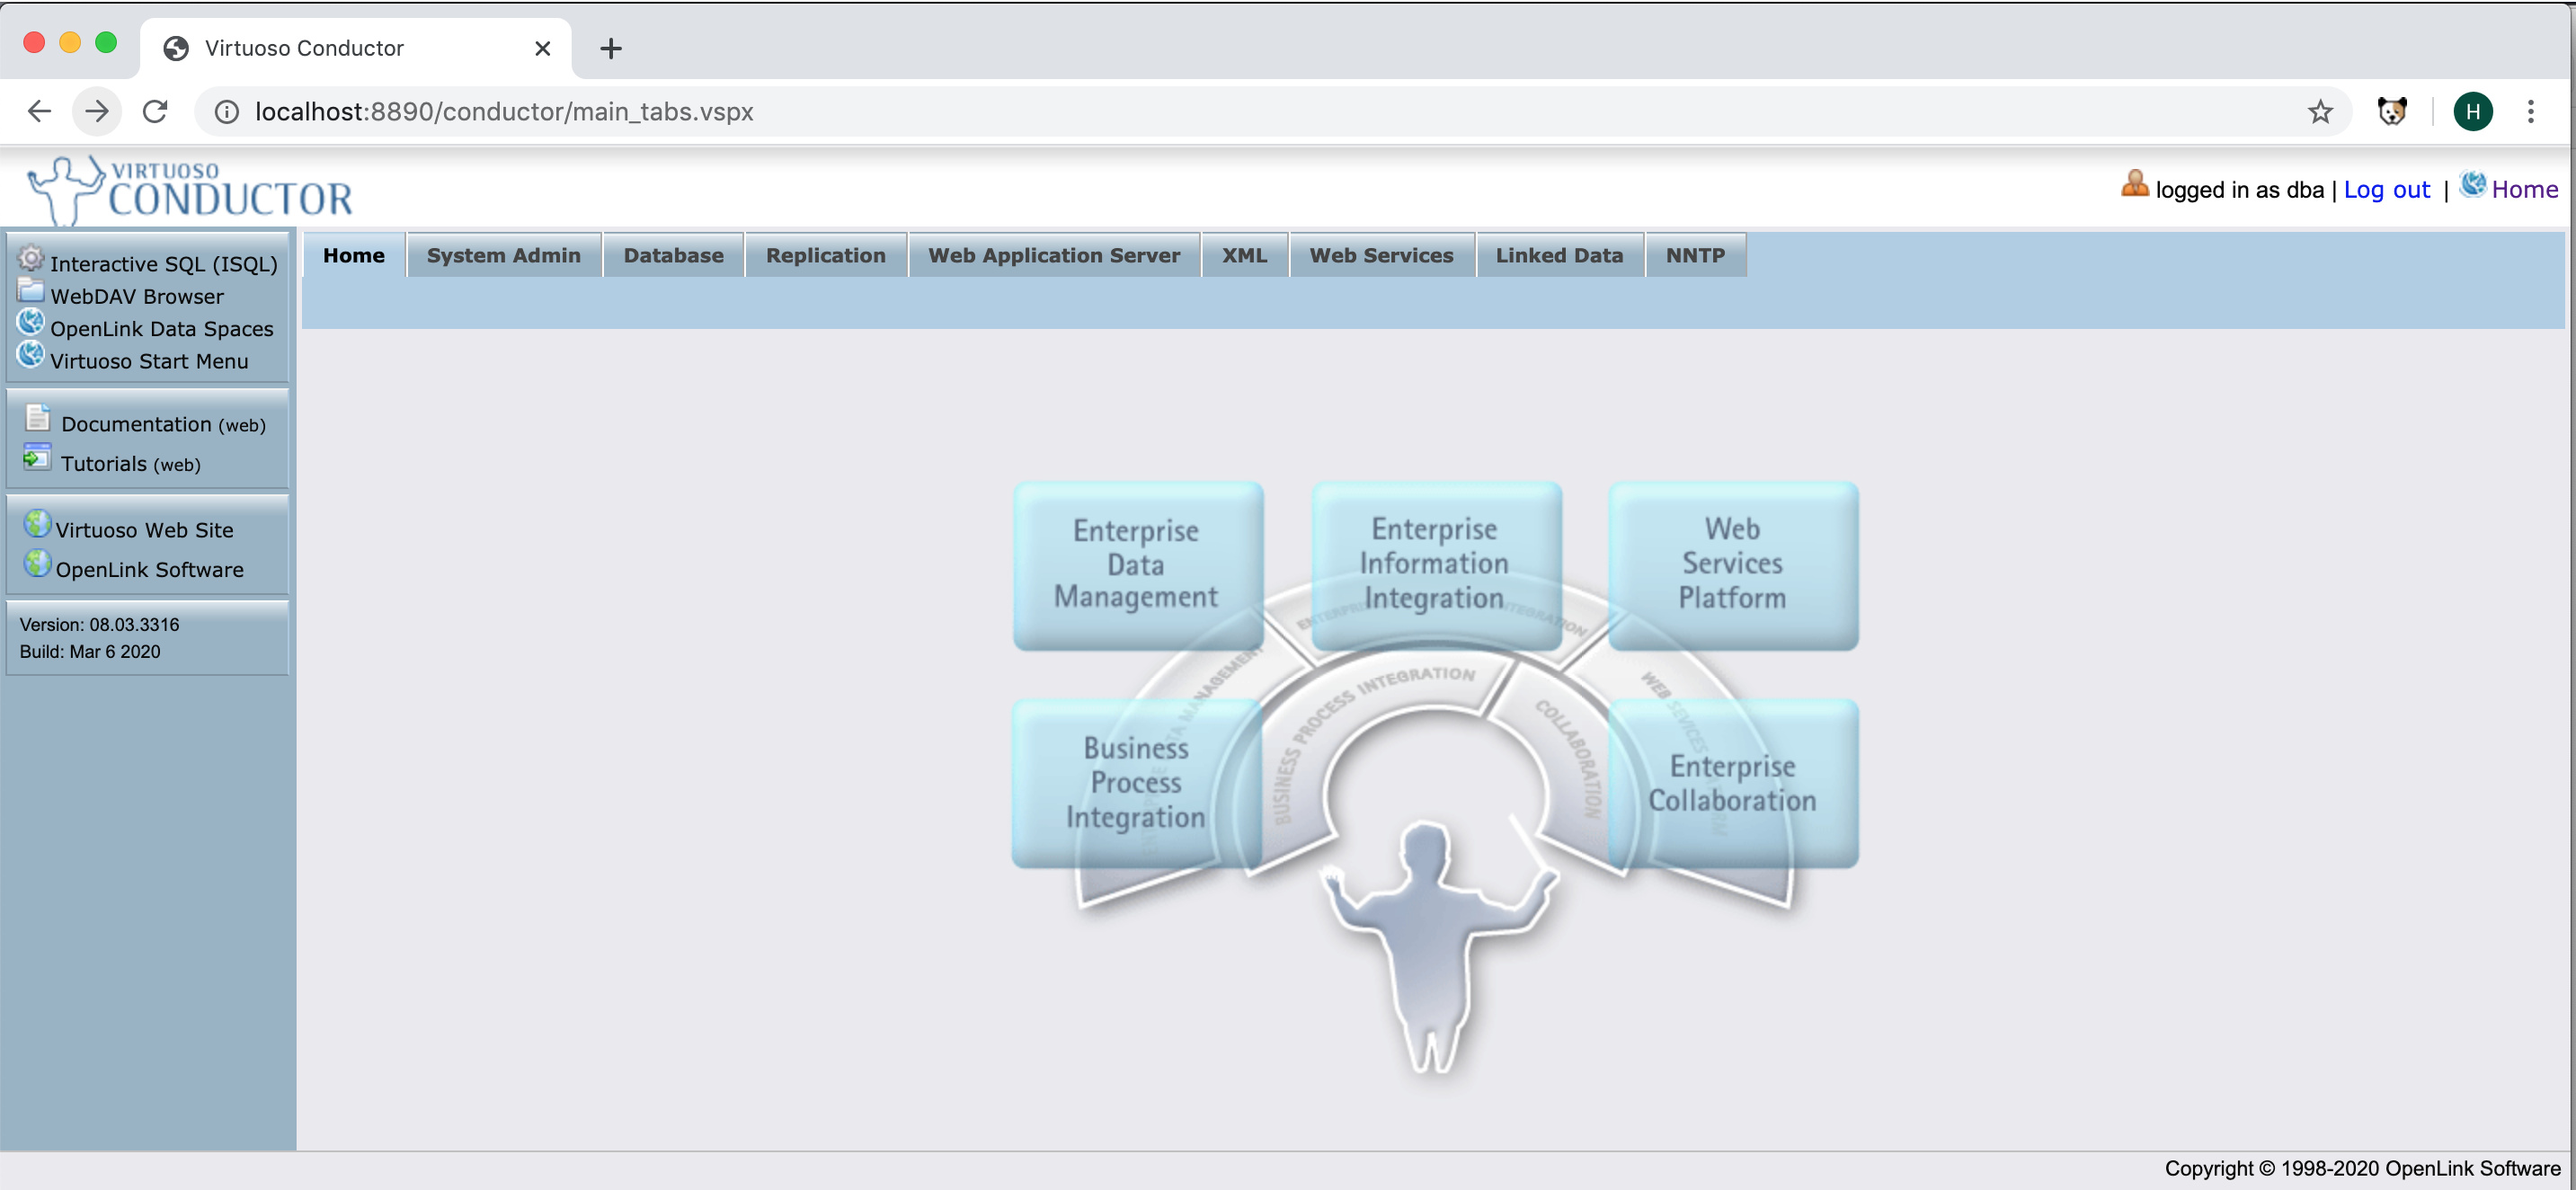
- Open the Virtuoso Conductor , Virtuoso’s HTTP-based administration tool, by selecting Open Virtuoso Conductor from the Virtuoso Monitor menu, or by loading this URL in your Web Browser:
http://localhost:8890/conductor. Login with the default username and password of dba and dba respectively.

- Use the Conductor to configure your Virtuoso instance for future use. For example, it is strongly advised that you change the default passwords for the
dbaanddavsuper-user accounts (drill down to System Admin → User Accounts ).
6 - Optional - Restore your old Data and Configuration Files
If you preserved existing data and configuration files at the start of this process, now is the time to bring them back into play.
-
If you used Virtuoso’s online backup feature, the documentation will walk you through the restoration process.
-
If you simply copied the INI and DB files elsewhere, and if they were Virtuoso 7.x files, you can just stop the current Virtuoso instance, and replace the newly created INI and DB with the old ones. For best results, we do advise that you compare the content of the old INI with the new, and add any new settings from the new to the old, adjust as may be appropriate to your deployment.
-
If you simply copied the INI and DB files elsewhere, and if they were Virtuoso 6.x or older files, there are some extra steps that must be taken.
7 - Troubleshooting
7.1 License Manager (Running)
If you are upgrading an existing installation you will need to stop and restart the License Manager in order for your new license to take effect using the following command sequence from your command-line:
-
sudo launchctl stop com.openlinksw.oplmgr
OR
sudo /Library/Application\ Support/OpenLink/bin/oplmgr +stop -
sudo launchctl start com.openlinksw.oplmgr
OR
sudo /Library/Application\ Support/openlink/bin/oplmgr +start +directory /Library/Application\ Support/openlink/Licenses
7.2 License Manager (Not Running)
In other situations where you receive License related errors, the following steps should aid resolution.
- Check Virtuoso log file (virtuoso.log) in the
databasedirectory of the installation, to ensure the Virtuoso server has successfully started on the default SQL (1111) and HTTP (8890) ports:
		Thu Mar 05 2020
16:06:15 { Loading plugin 1: Type `plain', file `wikiv' in `../hosting'
16:06:15   WikiV version 0.6 from OpenLink Software
16:06:15   Support functions for WikiV collaboration tool
16:06:15   SUCCESS plugin 1: loaded from ../hosting/wikiv.so }
16:06:15 { Loading plugin 2: Type `plain', file `mediawiki' in `../hosting'
16:06:15   MediaWiki version 0.1 from OpenLink Software
16:06:15   Support functions for MediaWiki collaboration tool
16:06:15   SUCCESS plugin 2: loaded from ../hosting/mediawiki.so }
16:06:15 { Loading plugin 3: Type `plain', file `creolewiki' in `../hosting'
16:06:15   CreoleWiki version 0.1 from OpenLink Software
16:06:15   Support functions for CreoleWiki collaboration tool
16:06:15   SUCCESS plugin 3: loaded from ../hosting/creolewiki.so }
16:06:15 { Loading plugin 4: Type `plain', file `im' in `../hosting'
16:06:15   IM version 0.63 from OpenLink Software
16:06:15   Support functions for Image Magick 6.9.10
16:06:15   SUCCESS plugin 4: loaded from ../hosting/im.so }
16:06:15 { Loading plugin 5: Type `plain', file `wbxml2' in `../hosting'
16:06:15   WBXML2 version 0.9 from OpenLink Software
16:06:15   Support functions for WBXML2 0.9.2 Library
16:06:15   SUCCESS plugin 5: loaded from ../hosting/wbxml2.so }
16:06:15 { Loading plugin 6: Type `attach', file `libphp5.so' in `../hosting'
16:06:15   SUCCESS plugin 6: loaded from ../hosting/libphp5.so }
16:06:15 { Loading plugin 7: Type `Hosting', file `hosting_php.so' in `../hosting'
16:06:15   Hosting version 3316 from OpenLink Software
16:06:15   PHP engine version 5.6.40
16:06:15   SUCCESS plugin 7: loaded from ../hosting/hosting_php.so }
16:06:15 { Loading plugin 8: Type `plain', file `qrcode' in `../hosting'
16:06:15   QRcode version 0.1 from OpenLink Software
16:06:15   Support functions for ISO/IEC 18004:2006, using QR Code encoder (C) 2006 Kentaro Fukuchi <fukichi@megaui.net>
16:06:15   SUCCESS plugin 8: loaded from ../hosting/qrcode.so }
16:06:15 { Loading plugin 10: Type `plain', file `proj4' in `../hosting'
16:06:15   plain version 1.0.3316 from OpenLink Software
16:06:15   Cartographic Projections support based on Frank Warmerdam's proj4 library
16:06:15   SUCCESS plugin 10: loaded from ../hosting/proj4.so }
16:06:15 { Loading plugin 11: Type `plain', file `geos' in `../hosting'
16:06:15   plain version 1.1.3316 from OpenLink Software
16:06:15   GEOS plugin based on Geometry Engine Open Source library from Open Source Geospatial Foundation
16:06:15   SUCCESS plugin 11: loaded from ../hosting/geos.so }
16:06:15 { Loading plugin 12: Type `plain', file `shapefileio' in `../hosting'
16:06:15   ShapefileIO version 0.1virt71 from OpenLink Software
16:06:15   Shapefile support based on Frank Warmerdam's Shapelib
16:06:15   SUCCESS plugin 12: loaded from ../hosting/shapefileio.so }
16:06:15 OpenLink Virtuoso Universal Server
16:06:15 Version 08.03.3316-pthreads for Mac OS X as of Mar  5 2020
16:06:15 uses OpenSSL 1.0.2s  28 May 2019
16:06:15 uses parts of PCRE, Html Tidy
16:06:15 Registered to OpenLink Software (INTERNAL USE ONLY)
16:06:15 Personal Edition license for 500 connections
16:06:15 Issued by Patrick van Kleef
16:06:15 This license will expire on Sat Jul 25 21:59:06 2020 GMT
16:06:15 Enabled Cluster Extension
16:06:15 Enabled Column Store Extension
16:06:15 Enabled Virtual Database Extension
16:06:15 Enabled Replication Extension
16:06:15 Enabled Scalable ACL Extension
16:06:15 Enabled Custom Reasoning & Inference Rules
16:06:15 Database version 3126
16:06:15 SQL Optimizer enabled (max 1000 layouts)
16:06:17 Compiler unit is timed at 0.000126 msec
16:06:17 Roll forward started
16:06:17 Roll forward complete
16:06:18 PL LOG: Initializing DB.DBA.SYS_PROJ4_SRIDS
16:06:18 PL LOG: ... checking for data files in "/usr/share/proj"
16:06:18 PL LOG: ... using built-in data
16:06:18 PL LOG: Initializing DB.DBA.SYS_PROJ4_SRIDS using built-in data
16:06:18 PL LOG: DB.DBA.SYS_PROJ4_SRIDS initialized with 8650 spatial reference systems
16:06:18 Checkpoint started
16:06:18 Checkpoint finished, log reused
16:06:20 HTTP/WebDAV server online at 8890
16:06:20 Server online at 1111 (pid 5585)
16:06:21 ZeroConfig registration virtuoso (LOCALHOST)
- Check the OpenLink License Manager (oplmgr) is running with the command
ps -ef | grep oplmgrfrom a terminal session:
$ ps -ef | grep oplmgr
    0    97     1   0 27Feb20 ??         0:01.32 /Library/Application Support/OpenLink/bin/oplmgr -fd /Library/Application Support/OpenLink/Licenses
  501 78847   886   0 12:14am ttys019    0:00.00 grep oplmgr
$
Start the License Manager manually using the command:
sudo launchctl start com.openlinksw.oplmgr
OR
sudo /Library/Application\ Support/openlink/bin/oplmgr +start +directory /Library/Application\ Support/openlink/Licenses
See the macOS OpenLink License Manager Usage documentation for additional information if your problems persist or contact our support services.